> ## Documentation Index
> Fetch the complete documentation index at: https://docs.markifact.com/llms.txt
> Use this file to discover all available pages before exploring further.
# Connect Shopify Store
> Connect your Shopify store to Markifact using a private app for secure, store-specific access to your data.
Markifact connects to your Shopify store using **Private Apps** created through Shopify's Developer Dashboard. This guide walks you through the setup process.
***
## About Private Apps
Private apps are **secure, store-specific applications** that you create and control. They:
* Are installed only on your specific store
* Give you full control over permissions
* Can be disconnected at any time
* Keep your data access private and secure
**Why Private Apps?** We initially built Shopify OAuth integration for seamless one-click connection. However, Shopify requires OAuth apps to use their billing system, which doesn't align with our existing subscription model. Private apps give you the same functionality with full control over your store's data access.
***
## Already Have a Custom App?
If you created a custom app before January 1, 2026, it will continue to work. You don't need to make any changes — your existing connection remains fully functional.
***
## Creating a Private App
Here's how the connection process works:
1. **Create a private app** in Shopify's Developer Dashboard — this app is exclusive to your store
2. **Create a version** and open its configuration page
3. **Request read all orders access** from the version page
4. **Configure permissions** (scopes) for what data the app can access
5. **Install the app** on your store using a private install link
6. **Copy your credentials** (Client ID and Client Secret) from the dashboard
7. **Connect in Markifact** — we securely store your credentials and verify the connection
1) Login in Shopify admin then go to [dev.shopify.com/dashboard](https://dev.shopify.com/dashboard/)
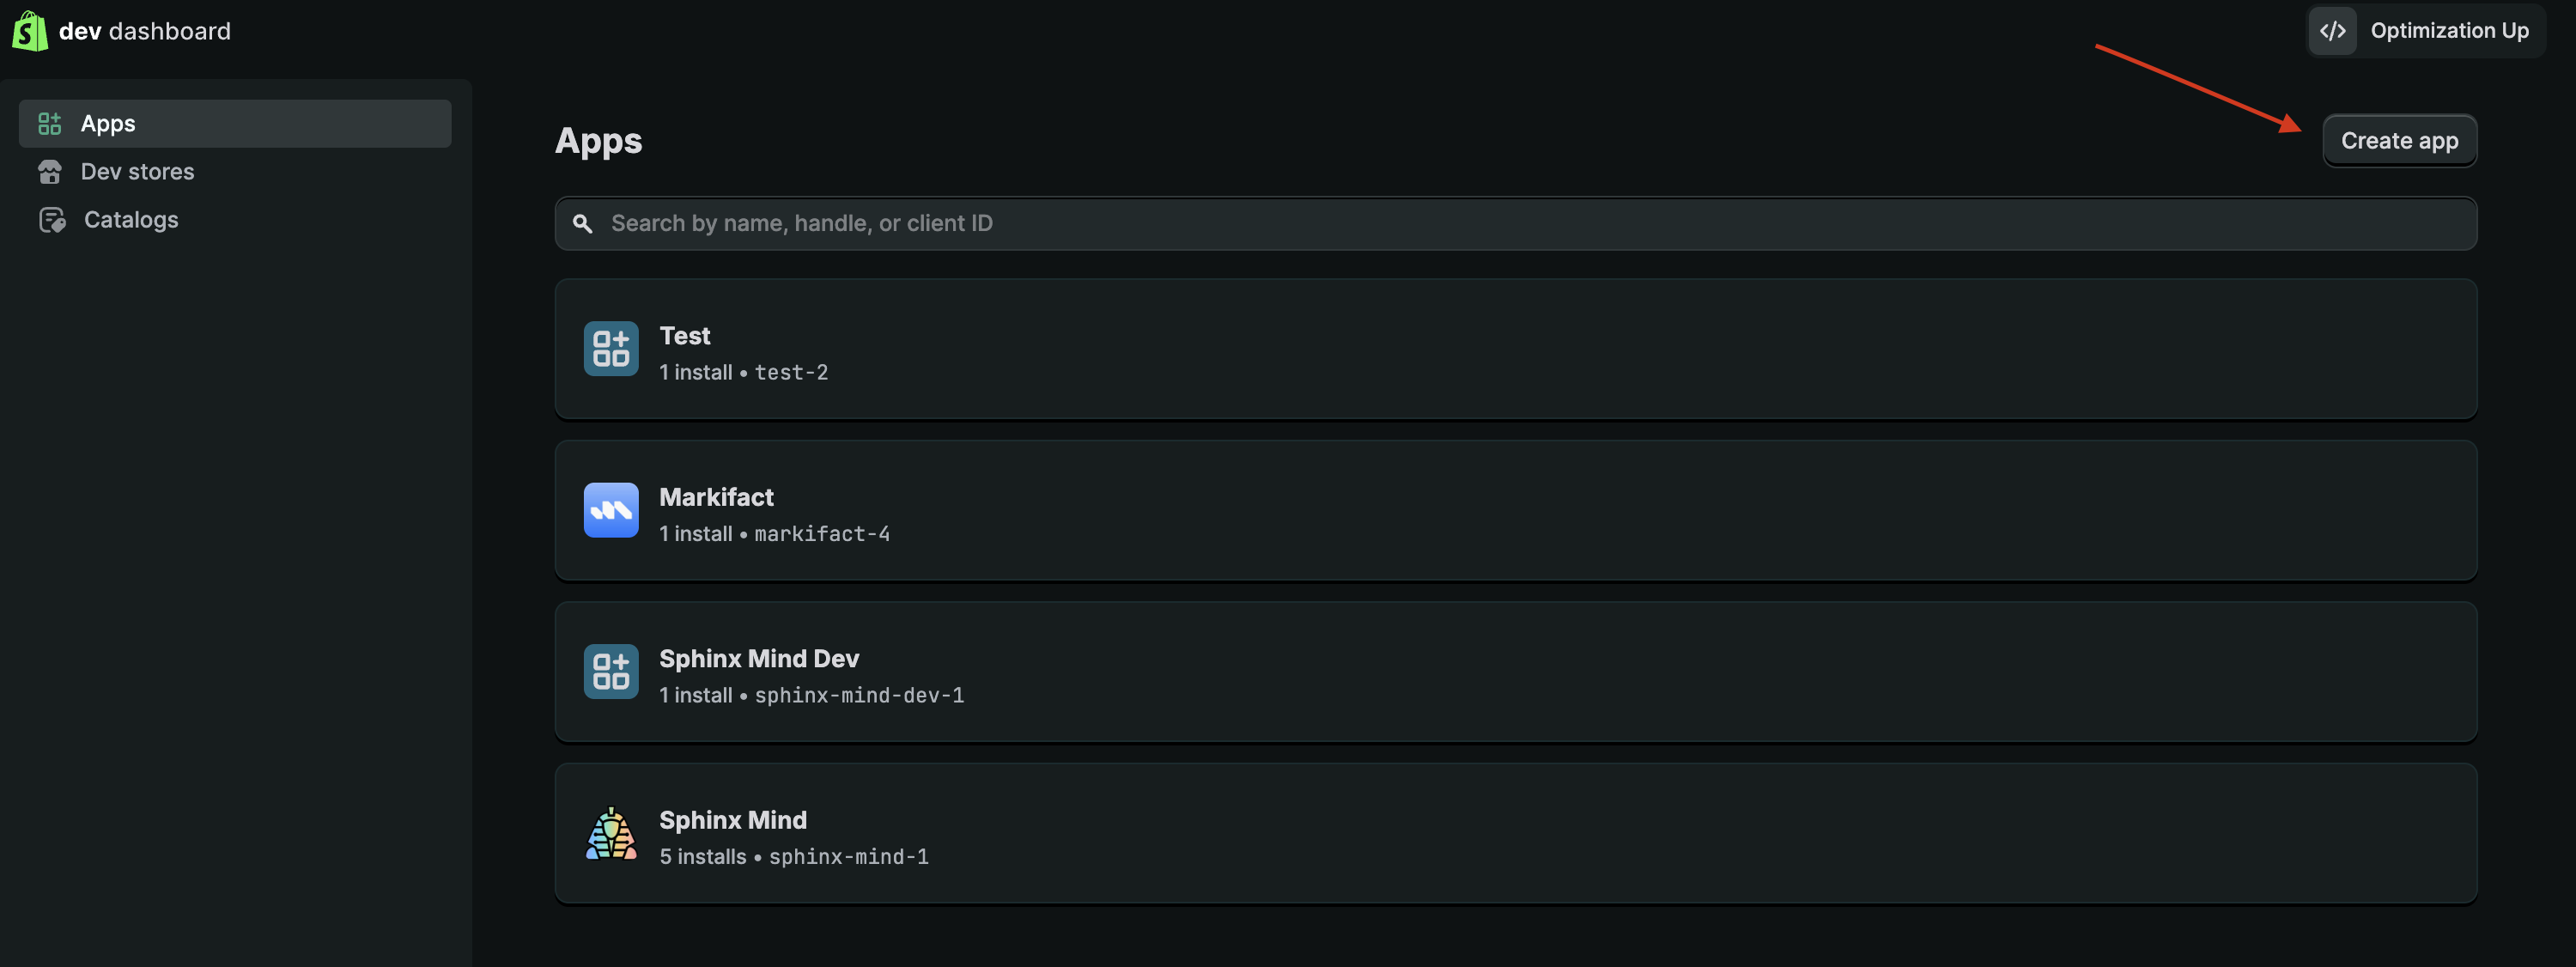
2) Click **"Create app"** in the top-right corner
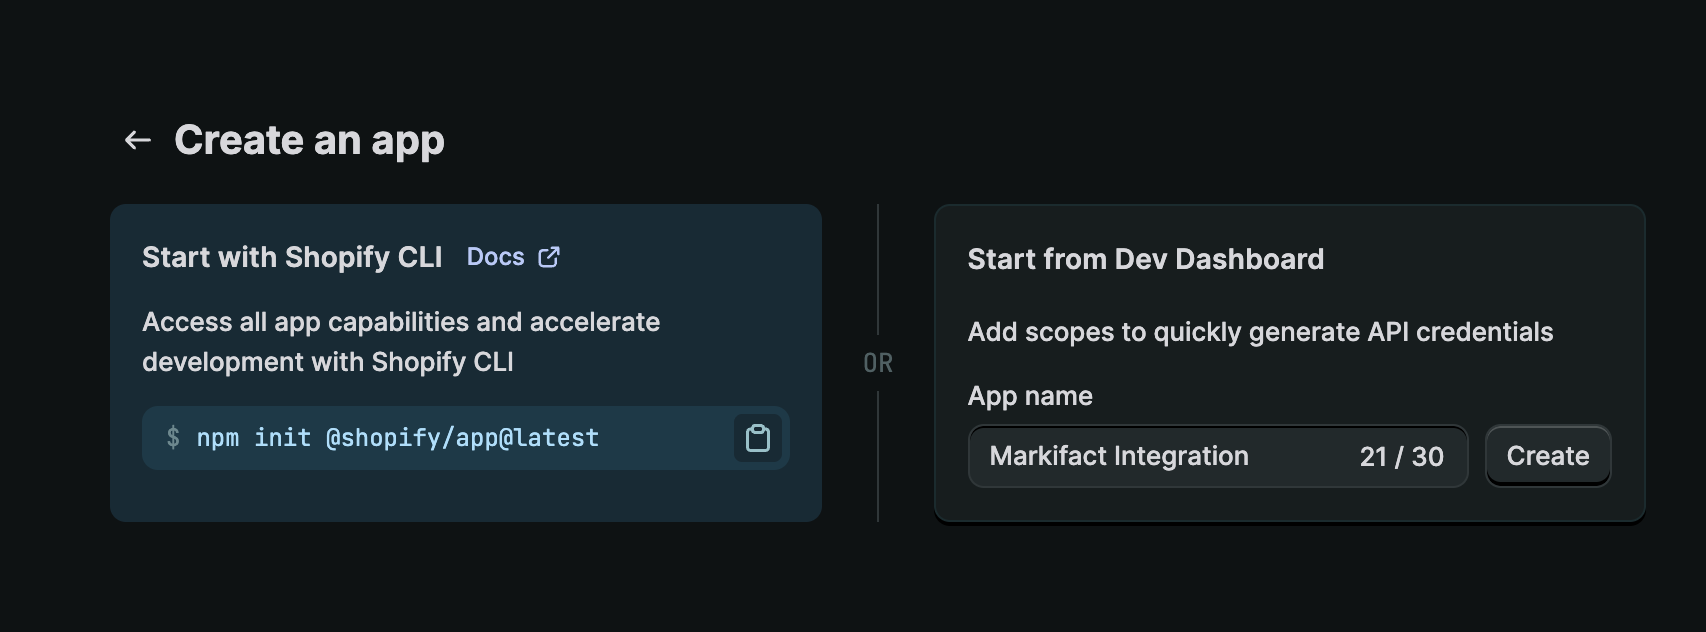
 1. Under **"Start from Dev Dashboard"**, enter a name for your app (e.g., "Markifact Integration")
2. App names can be up to 30 characters
3. Click **"Create"**
1. Under **"Start from Dev Dashboard"**, enter a name for your app (e.g., "Markifact Integration")
2. App names can be up to 30 characters
3. Click **"Create"**
 Shopify requires permission before you can include the `read_all_orders` scope in an app version. This scope lets Markifact read orders older than the last 60 days, which is required for historical reporting.
1. After creating the app, Shopify will prompt you to create a version. Click it to open the version configuration page.
2. If you are returning to an existing app, click **"Versions"** in the left sidebar, then create a new version or open the draft version you want to update.
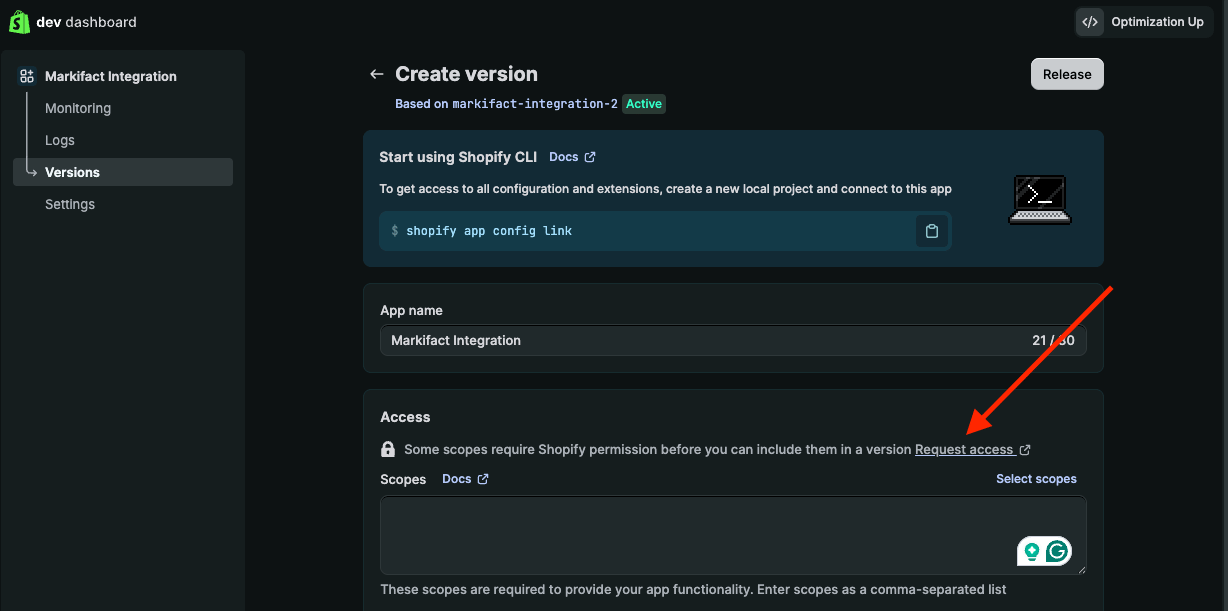
3. On the version configuration page, go to the **"Access"** section and click **"Request access"** next to the message about scopes that require Shopify permission
4. In **"Read all orders scope"**, click **"Request access"**
5. Enter a short reason, such as:
```
Pull historical order data month on month for analytics.
```
6. Click **"Request access"**
7. After Shopify approves the request, go back to the same version configuration page
Shopify requires permission before you can include the `read_all_orders` scope in an app version. This scope lets Markifact read orders older than the last 60 days, which is required for historical reporting.
1. After creating the app, Shopify will prompt you to create a version. Click it to open the version configuration page.
2. If you are returning to an existing app, click **"Versions"** in the left sidebar, then create a new version or open the draft version you want to update.
3. On the version configuration page, go to the **"Access"** section and click **"Request access"** next to the message about scopes that require Shopify permission
4. In **"Read all orders scope"**, click **"Request access"**
5. Enter a short reason, such as:
```
Pull historical order data month on month for analytics.
```
6. Click **"Request access"**
7. After Shopify approves the request, go back to the same version configuration page
 Shopify usually approves this request immediately from the form. Once approved, you can add `read_all_orders` with the other required scopes.
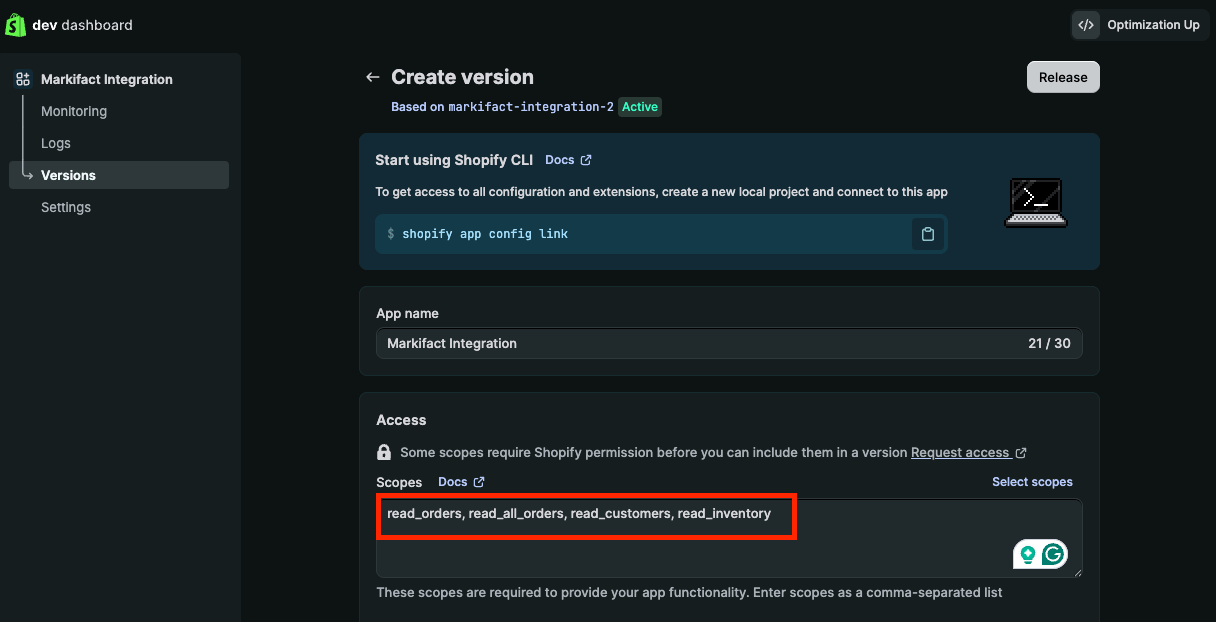
On the same version configuration page, stay in the **"Access"** section and add the required API scopes (permissions).
**All scopes are required.** Make sure to add all four scopes listed below.
| Scope | Purpose |
| :---------------- | :------------------------------------------ |
| `read_orders` | Access order data for sales reporting |
| `read_all_orders` | Access historical orders older than 60 days |
| `read_customers` | Access customer data for analytics |
| `read_inventory` | Access inventory levels and product data |
**To add scopes:**
Copy and paste the following scopes into the text box:
```
read_orders, read_all_orders, read_customers, read_inventory
```
If Shopify shows `read_all_orders` as an invalid scope after your request is approved, refresh the version page and try adding the scopes again.
Alternatively, click **"Select Scopes"**, check the boxes next to each required scope, and click **"Done"**.
Shopify usually approves this request immediately from the form. Once approved, you can add `read_all_orders` with the other required scopes.
On the same version configuration page, stay in the **"Access"** section and add the required API scopes (permissions).
**All scopes are required.** Make sure to add all four scopes listed below.
| Scope | Purpose |
| :---------------- | :------------------------------------------ |
| `read_orders` | Access order data for sales reporting |
| `read_all_orders` | Access historical orders older than 60 days |
| `read_customers` | Access customer data for analytics |
| `read_inventory` | Access inventory levels and product data |
**To add scopes:**
Copy and paste the following scopes into the text box:
```
read_orders, read_all_orders, read_customers, read_inventory
```
If Shopify shows `read_all_orders` as an invalid scope after your request is approved, refresh the version page and try adding the scopes again.
Alternatively, click **"Select Scopes"**, check the boxes next to each required scope, and click **"Done"**.
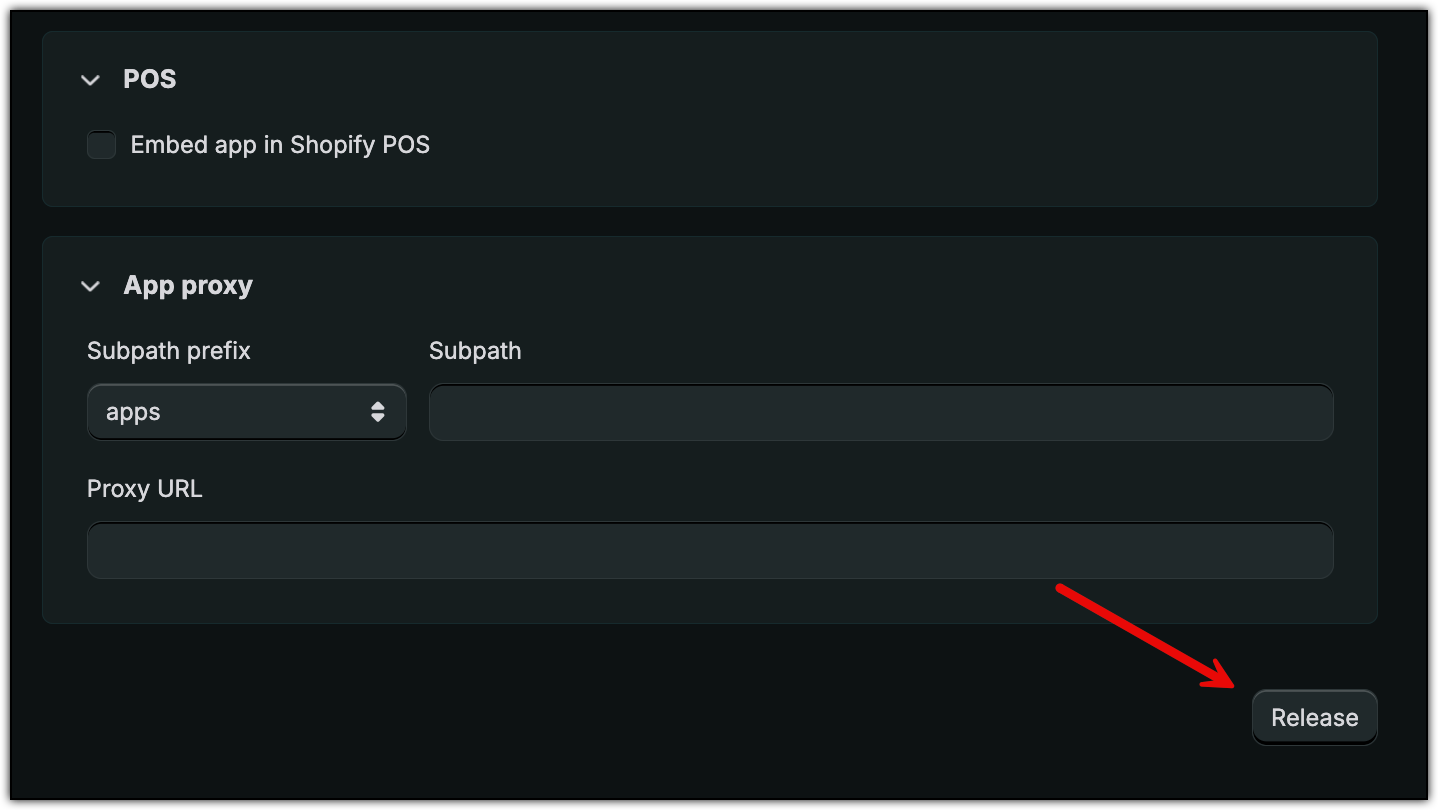
 1. Click the **"Release"** button in the top-right corner
2. Optionally, enter a version name and message
3. Click **"Release"** to confirm
After releasing, you'll see your version listed in the Versions page.
1. Click the **"Release"** button in the top-right corner
2. Optionally, enter a version name and message
3. Click **"Release"** to confirm
After releasing, you'll see your version listed in the Versions page.
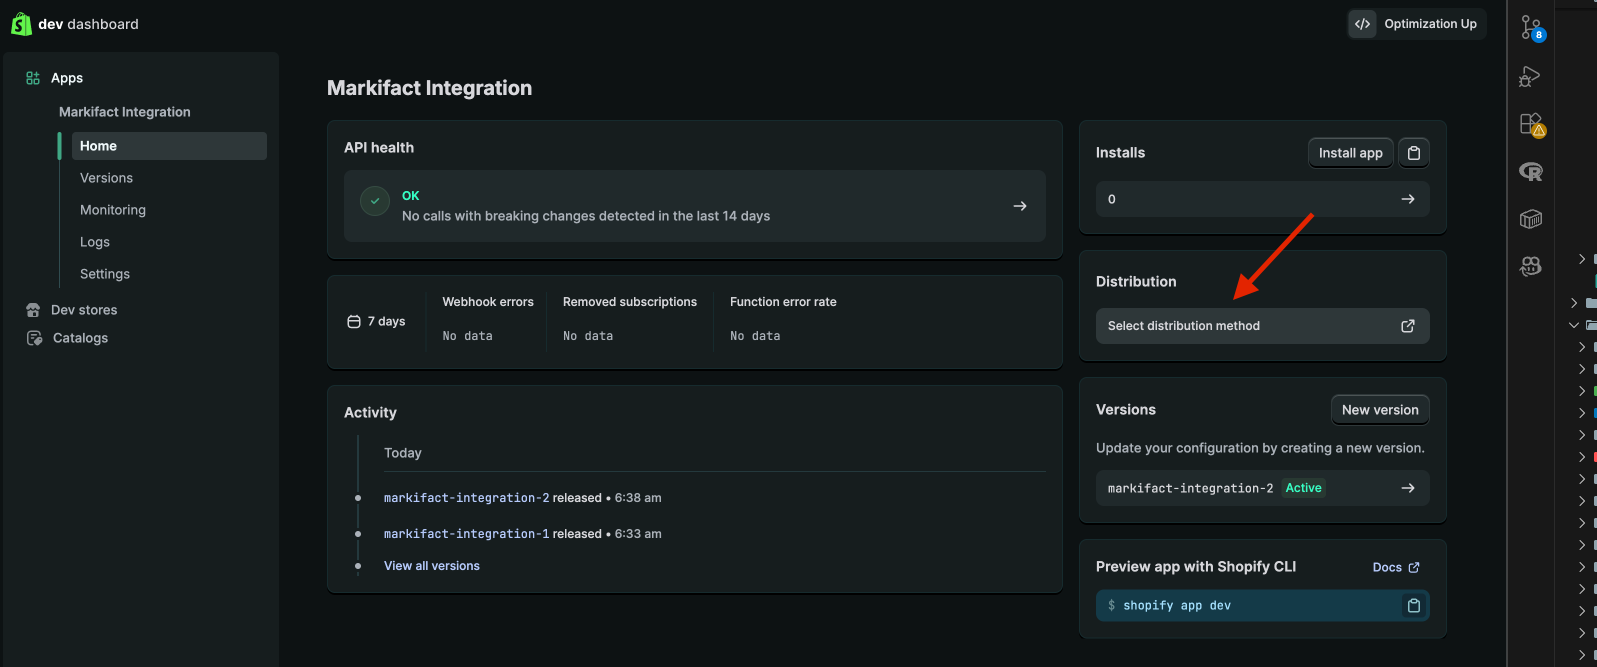
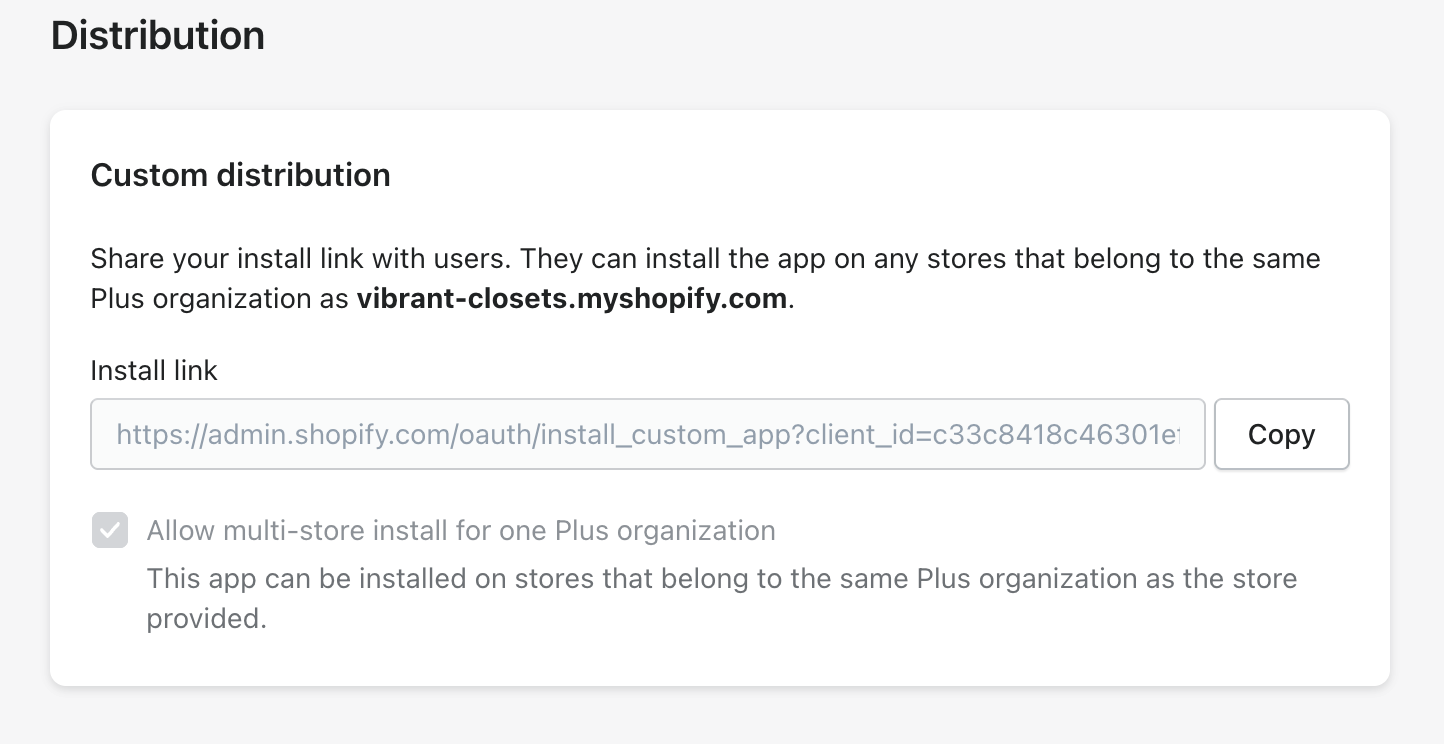
 Before installing, you need to configure the app for private distribution to your store.
1. In the Developer Dashboard, click **"Distribution"** in the sidebar (or click **"Select distribution method"**)
**Can't find Distribution?** No problem. Click **"Install app"** and install it on your store. You can skip the distribution step entirely and continue to the next step.
Before installing, you need to configure the app for private distribution to your store.
1. In the Developer Dashboard, click **"Distribution"** in the sidebar (or click **"Select distribution method"**)
**Can't find Distribution?** No problem. Click **"Install app"** and install it on your store. You can skip the distribution step entirely and continue to the next step.
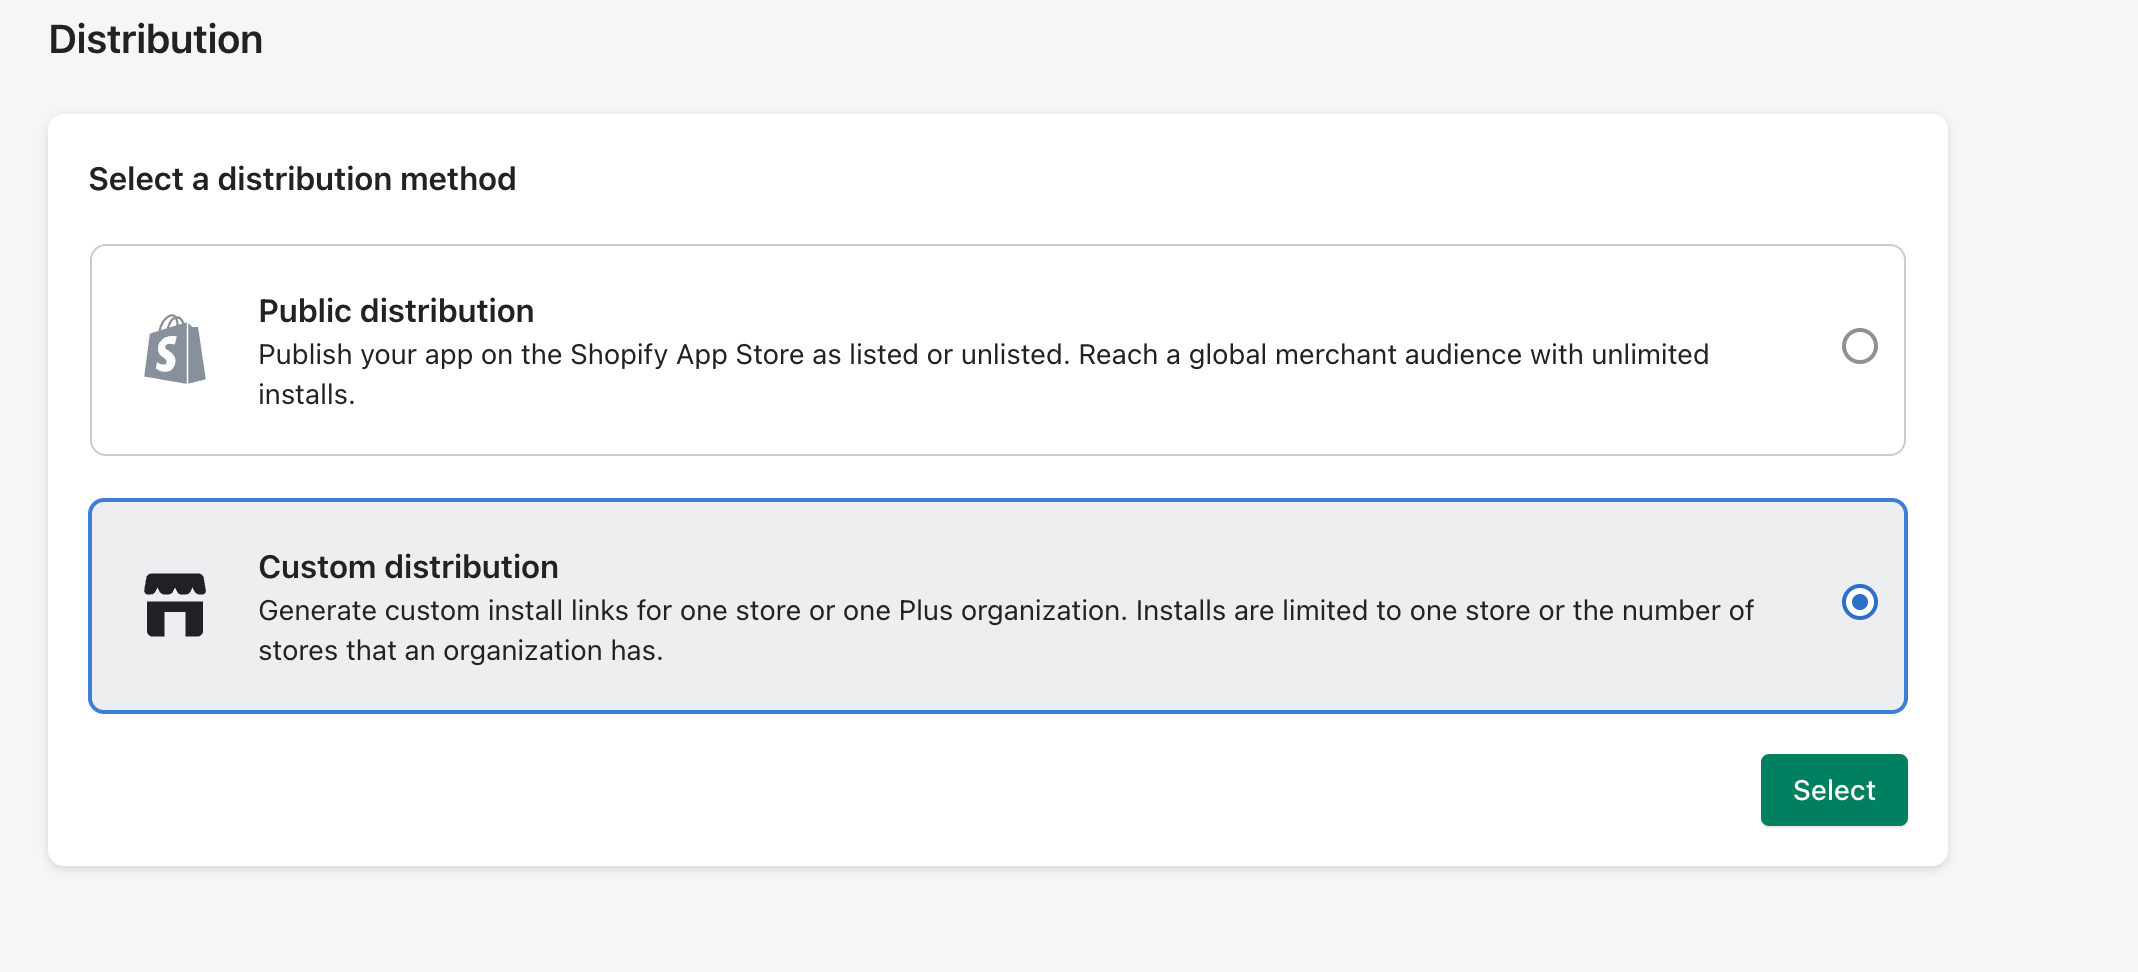
 2\. Select **"Custom distribution"** and click **"Select"**, then confirm by clicking **"Select custom distribution"**
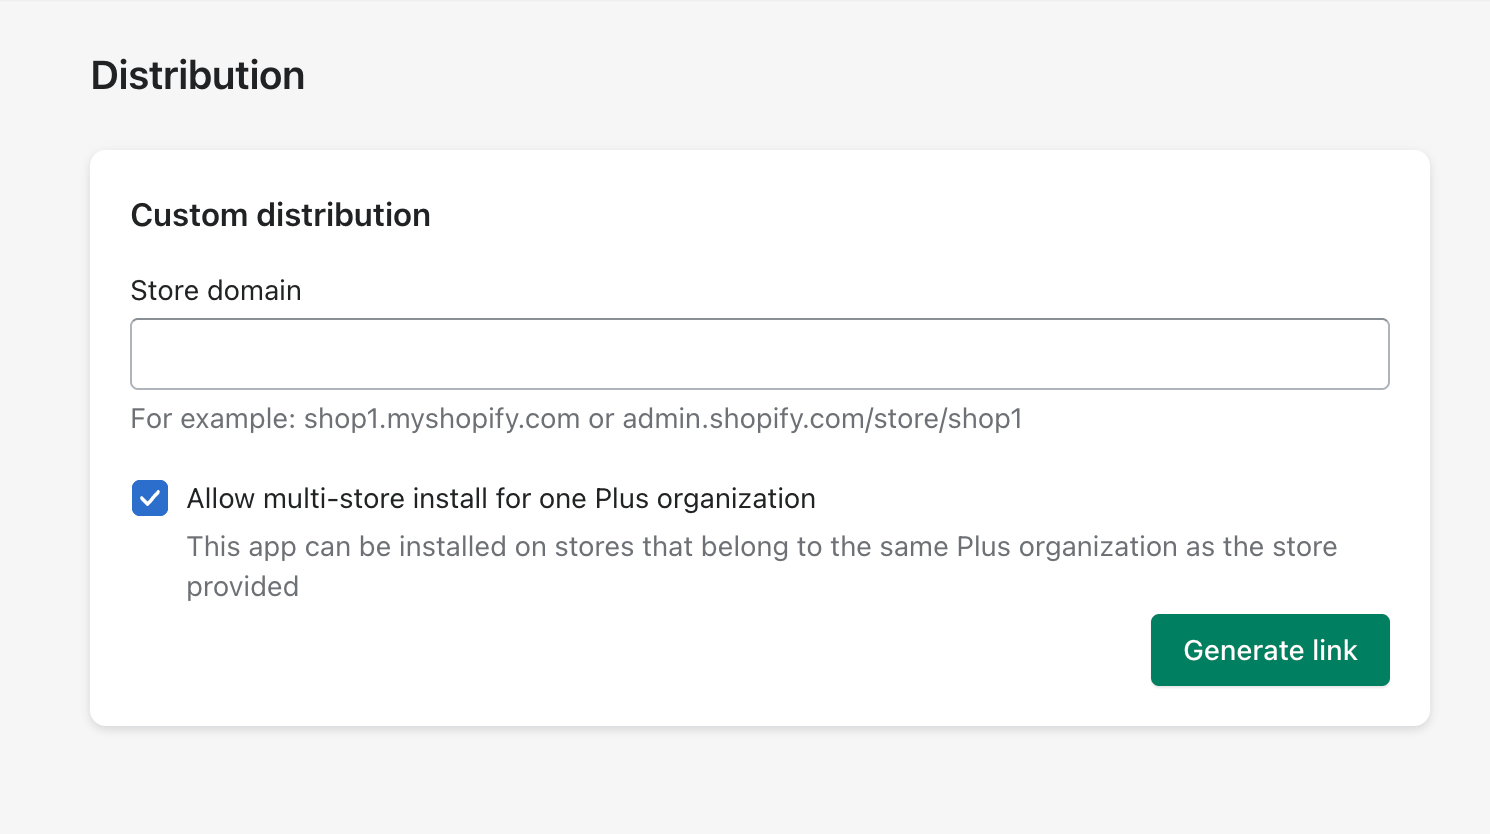
 3. Enter your **Store domain** (e.g., `your-store.myshopify.com`)
4. If you have multiple stores under a Shopify Plus organization, check **"Allow multi-store install for one Plus organization"**
5. Click **"Generate link"** and confirm
3. Enter your **Store domain** (e.g., `your-store.myshopify.com`)
4. If you have multiple stores under a Shopify Plus organization, check **"Allow multi-store install for one Plus organization"**
5. Click **"Generate link"** and confirm
 6. Copy the **Install link** — you'll use this to install the app on your store
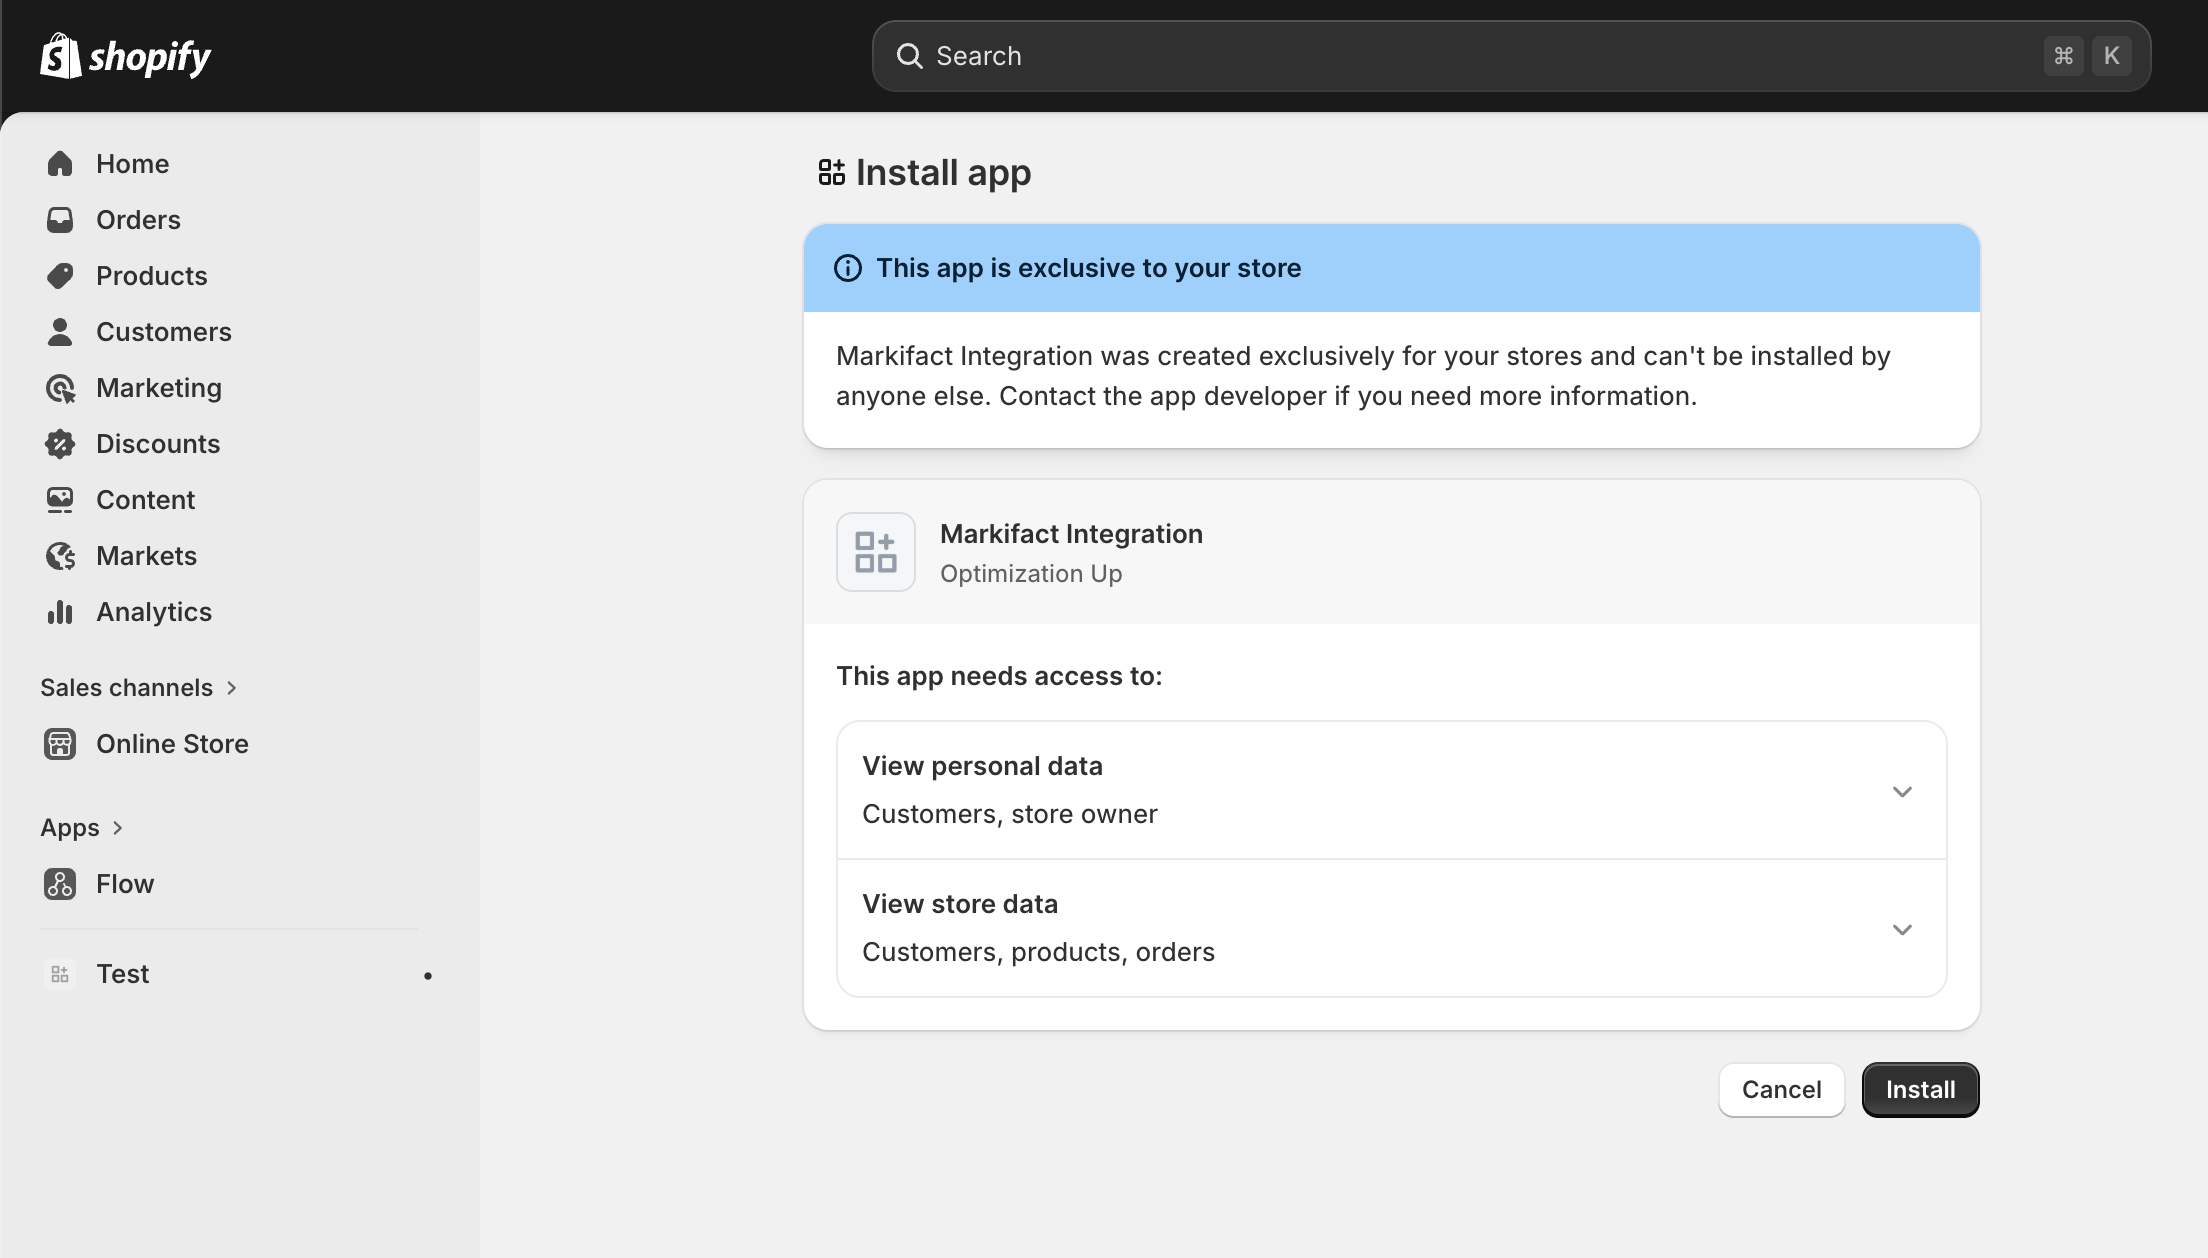
 1. Open the **Install link** you copied in the previous step
2. Select your store if prompted
3. Review the permissions — you'll see the app is **exclusive to your store**
4. Click **"Install"**
1. Open the **Install link** you copied in the previous step
2. Select your store if prompted
3. Review the permissions — you'll see the app is **exclusive to your store**
4. Click **"Install"**
 Once installed, the app will appear in the left-side menu of your Shopify admin.
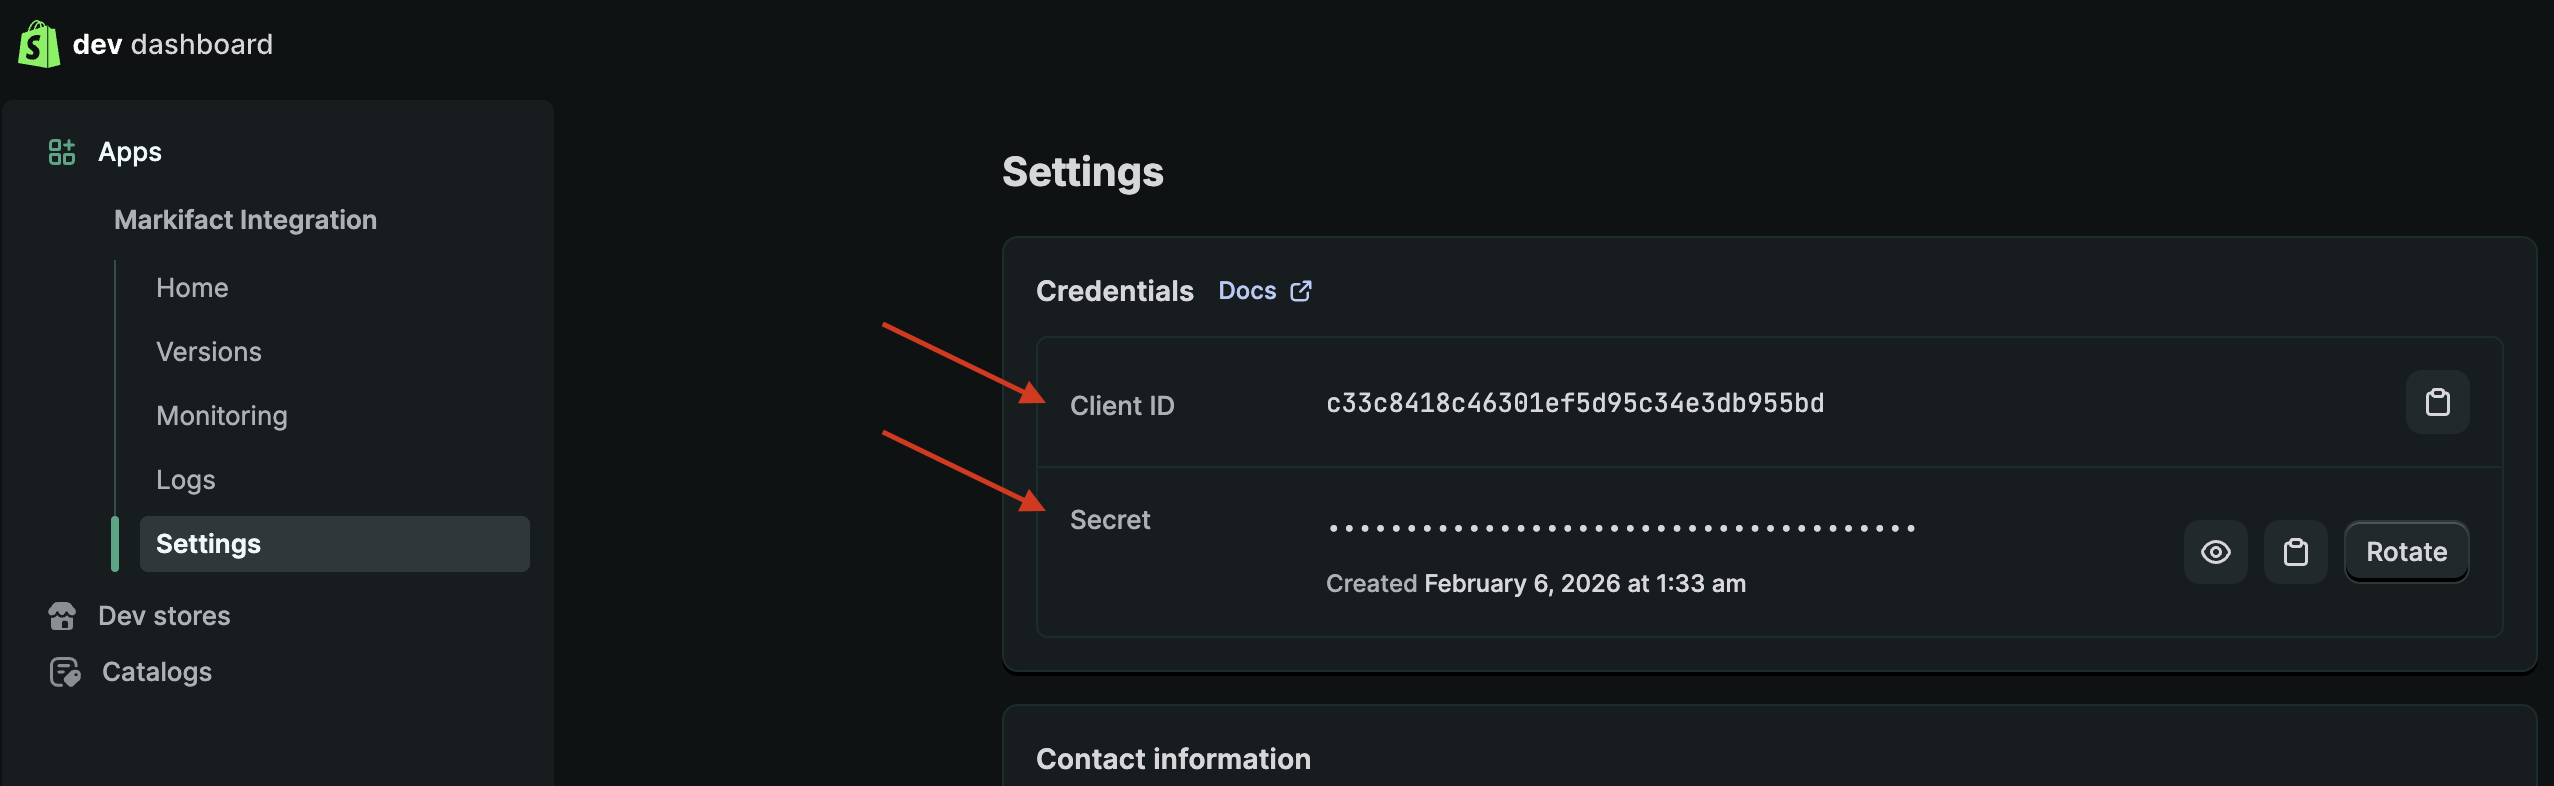
After installation, you need to retrieve your **Client ID** and **Client Secret** from the Developer Dashboard.
1. Go back to [dev.shopify.com](https://dev.shopify.com/dashboard/) and select your app
2. Click **"Settings"** in the left sidebar
3. Under **"Credentials"**, click the copy icon next to **Client ID**
4. Click the copy icon next to **Secret** to copy your Client Secret
Once installed, the app will appear in the left-side menu of your Shopify admin.
After installation, you need to retrieve your **Client ID** and **Client Secret** from the Developer Dashboard.
1. Go back to [dev.shopify.com](https://dev.shopify.com/dashboard/) and select your app
2. Click **"Settings"** in the left sidebar
3. Under **"Credentials"**, click the copy icon next to **Client ID**
4. Click the copy icon next to **Secret** to copy your Client Secret
 > **Important:** Keep these credentials secure. Anyone with your Client ID and Secret can access your store data.
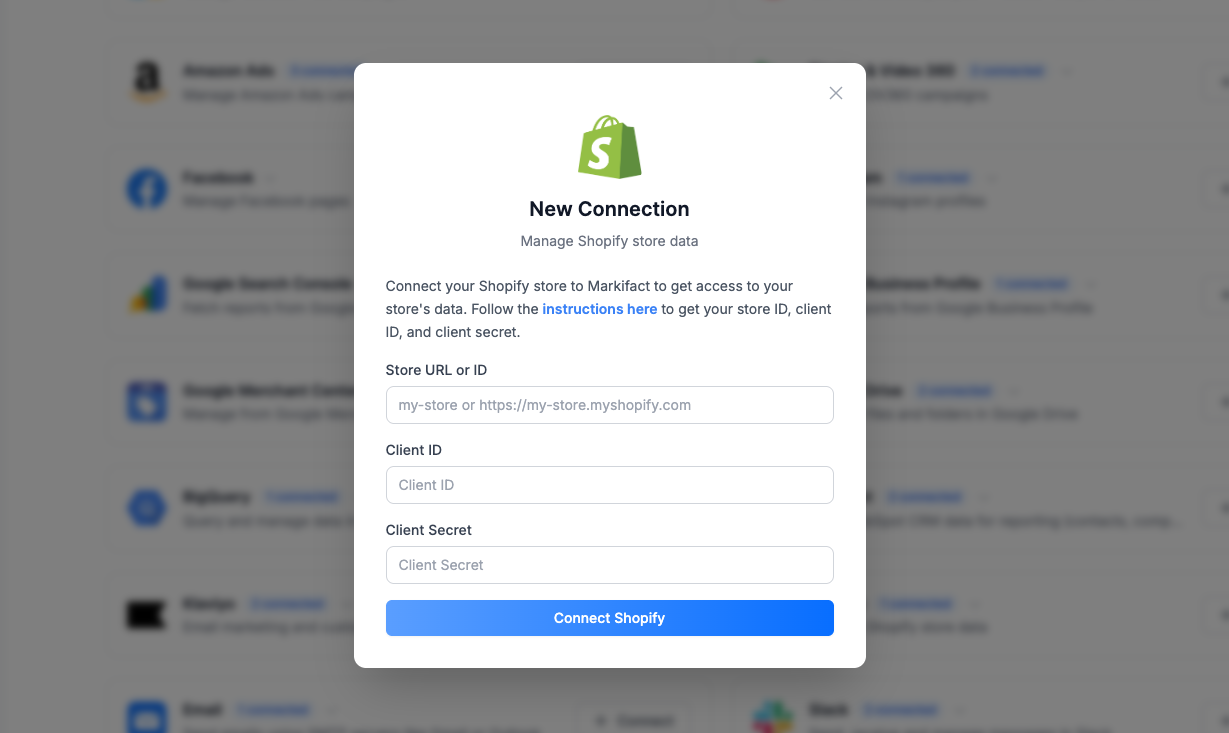
1. In Markifact, go to the [Connections](https://app.markifact.com/connections) page
2. Click **"Connect Shopify"**
3. Enter your **Store URL or ID** (e.g., `your-store` or `your-store.myshopify.com`)
4. Paste your **Client ID**
5. Paste your **Client Secret**
6. Click **"Connect Shopify"**
> **Important:** Keep these credentials secure. Anyone with your Client ID and Secret can access your store data.
1. In Markifact, go to the [Connections](https://app.markifact.com/connections) page
2. Click **"Connect Shopify"**
3. Enter your **Store URL or ID** (e.g., `your-store` or `your-store.myshopify.com`)
4. Paste your **Client ID**
5. Paste your **Client Secret**
6. Click **"Connect Shopify"**
 ***
## Disconnecting Your Store
You can disconnect your Shopify store at any time:
**From Markifact:**
1. Go to [Connections](https://app.markifact.com/connections)
2. Find your Shopify connection
3. Click **"Disconnect"**
**From Shopify:**
1. Go to **Settings** → **Apps and sales channels**
2. Find your Markifact integration app
3. Click **"Delete app"**
***
## Troubleshooting
Ensure you copied the **Client ID** and **Client Secret** correctly from the Developer Dashboard under **Settings** → **Credentials**. If you rotated your secret, make sure to update it in Markifact as well.
Verify that all required scopes are added to your app:
* `read_orders`
* `read_all_orders`
* `read_customers`
* `read_inventory`
After adding missing scopes, you need to **release a new version** and **reinstall the app** for changes to take effect.
Check that your store URL is correct. It should be in the format `your-store.myshopify.com` (without `https://` or trailing slashes).
Shopify has API rate limits. If you're running many reports simultaneously, you may hit these limits. Try spacing out your requests or reducing the frequency of automated workflows.
***
## Summary
| Item | Where to Find | Example |
| ------------------- | -------------------------------------- | -------------------------------------------------------------------- |
| **Store URL** | Your Shopify store URL | `your-store.myshopify.com` |
| **Client ID** | Dev Dashboard → Settings → Credentials | `c33c8418c46301ef5d95...` |
| **Client Secret** | Dev Dashboard → Settings → Credentials | `abc123def456...` |
| **Required Scopes** | Configure in Dev Dashboard → Versions | `read_orders`, `read_all_orders`, `read_customers`, `read_inventory` |
***
## Related
Fetch orders, customers, and inventory data from your store
***
## Disconnecting Your Store
You can disconnect your Shopify store at any time:
**From Markifact:**
1. Go to [Connections](https://app.markifact.com/connections)
2. Find your Shopify connection
3. Click **"Disconnect"**
**From Shopify:**
1. Go to **Settings** → **Apps and sales channels**
2. Find your Markifact integration app
3. Click **"Delete app"**
***
## Troubleshooting
Ensure you copied the **Client ID** and **Client Secret** correctly from the Developer Dashboard under **Settings** → **Credentials**. If you rotated your secret, make sure to update it in Markifact as well.
Verify that all required scopes are added to your app:
* `read_orders`
* `read_all_orders`
* `read_customers`
* `read_inventory`
After adding missing scopes, you need to **release a new version** and **reinstall the app** for changes to take effect.
Check that your store URL is correct. It should be in the format `your-store.myshopify.com` (without `https://` or trailing slashes).
Shopify has API rate limits. If you're running many reports simultaneously, you may hit these limits. Try spacing out your requests or reducing the frequency of automated workflows.
***
## Summary
| Item | Where to Find | Example |
| ------------------- | -------------------------------------- | -------------------------------------------------------------------- |
| **Store URL** | Your Shopify store URL | `your-store.myshopify.com` |
| **Client ID** | Dev Dashboard → Settings → Credentials | `c33c8418c46301ef5d95...` |
| **Client Secret** | Dev Dashboard → Settings → Credentials | `abc123def456...` |
| **Required Scopes** | Configure in Dev Dashboard → Versions | `read_orders`, `read_all_orders`, `read_customers`, `read_inventory` |
***
## Related
Fetch orders, customers, and inventory data from your store