> ## Documentation Index
> Fetch the complete documentation index at: https://docs.markifact.com/llms.txt
> Use this file to discover all available pages before exploring further.
# Custom Slack App
> Connect your own Slack app to Markifact for enhanced control, custom branding, and organization-specific requirements.
Markifact supports two ways to connect Slack: using the built-in **Markifact Slack App** (Quick Connect) or connecting your own **Custom Slack App**. This guide explains both options and walks you through setting up your own custom Slack app.
***
## Quick Connect vs Custom App
| Feature | Quick Connect | Custom App |
| :-------------- | :-------------------------------- | :------------------------------------------- |
| **Setup Time** | 1 minute | 10-15 minutes |
| **Bot Name** | "Markifact" | Your custom name |
| **Bot Icon** | Markifact logo | Your custom icon |
| **White Label** | No | Yes |
| **IT Approval** | May require | Easier to approve |
| **Best For** | Quick setup, testing, small teams | Enterprise, custom branding, strict security |
***
## Setting Up Your Custom Slack App
**Already have a Slack app?** Skip Step 1 and go directly to Step 2 to configure your existing app.
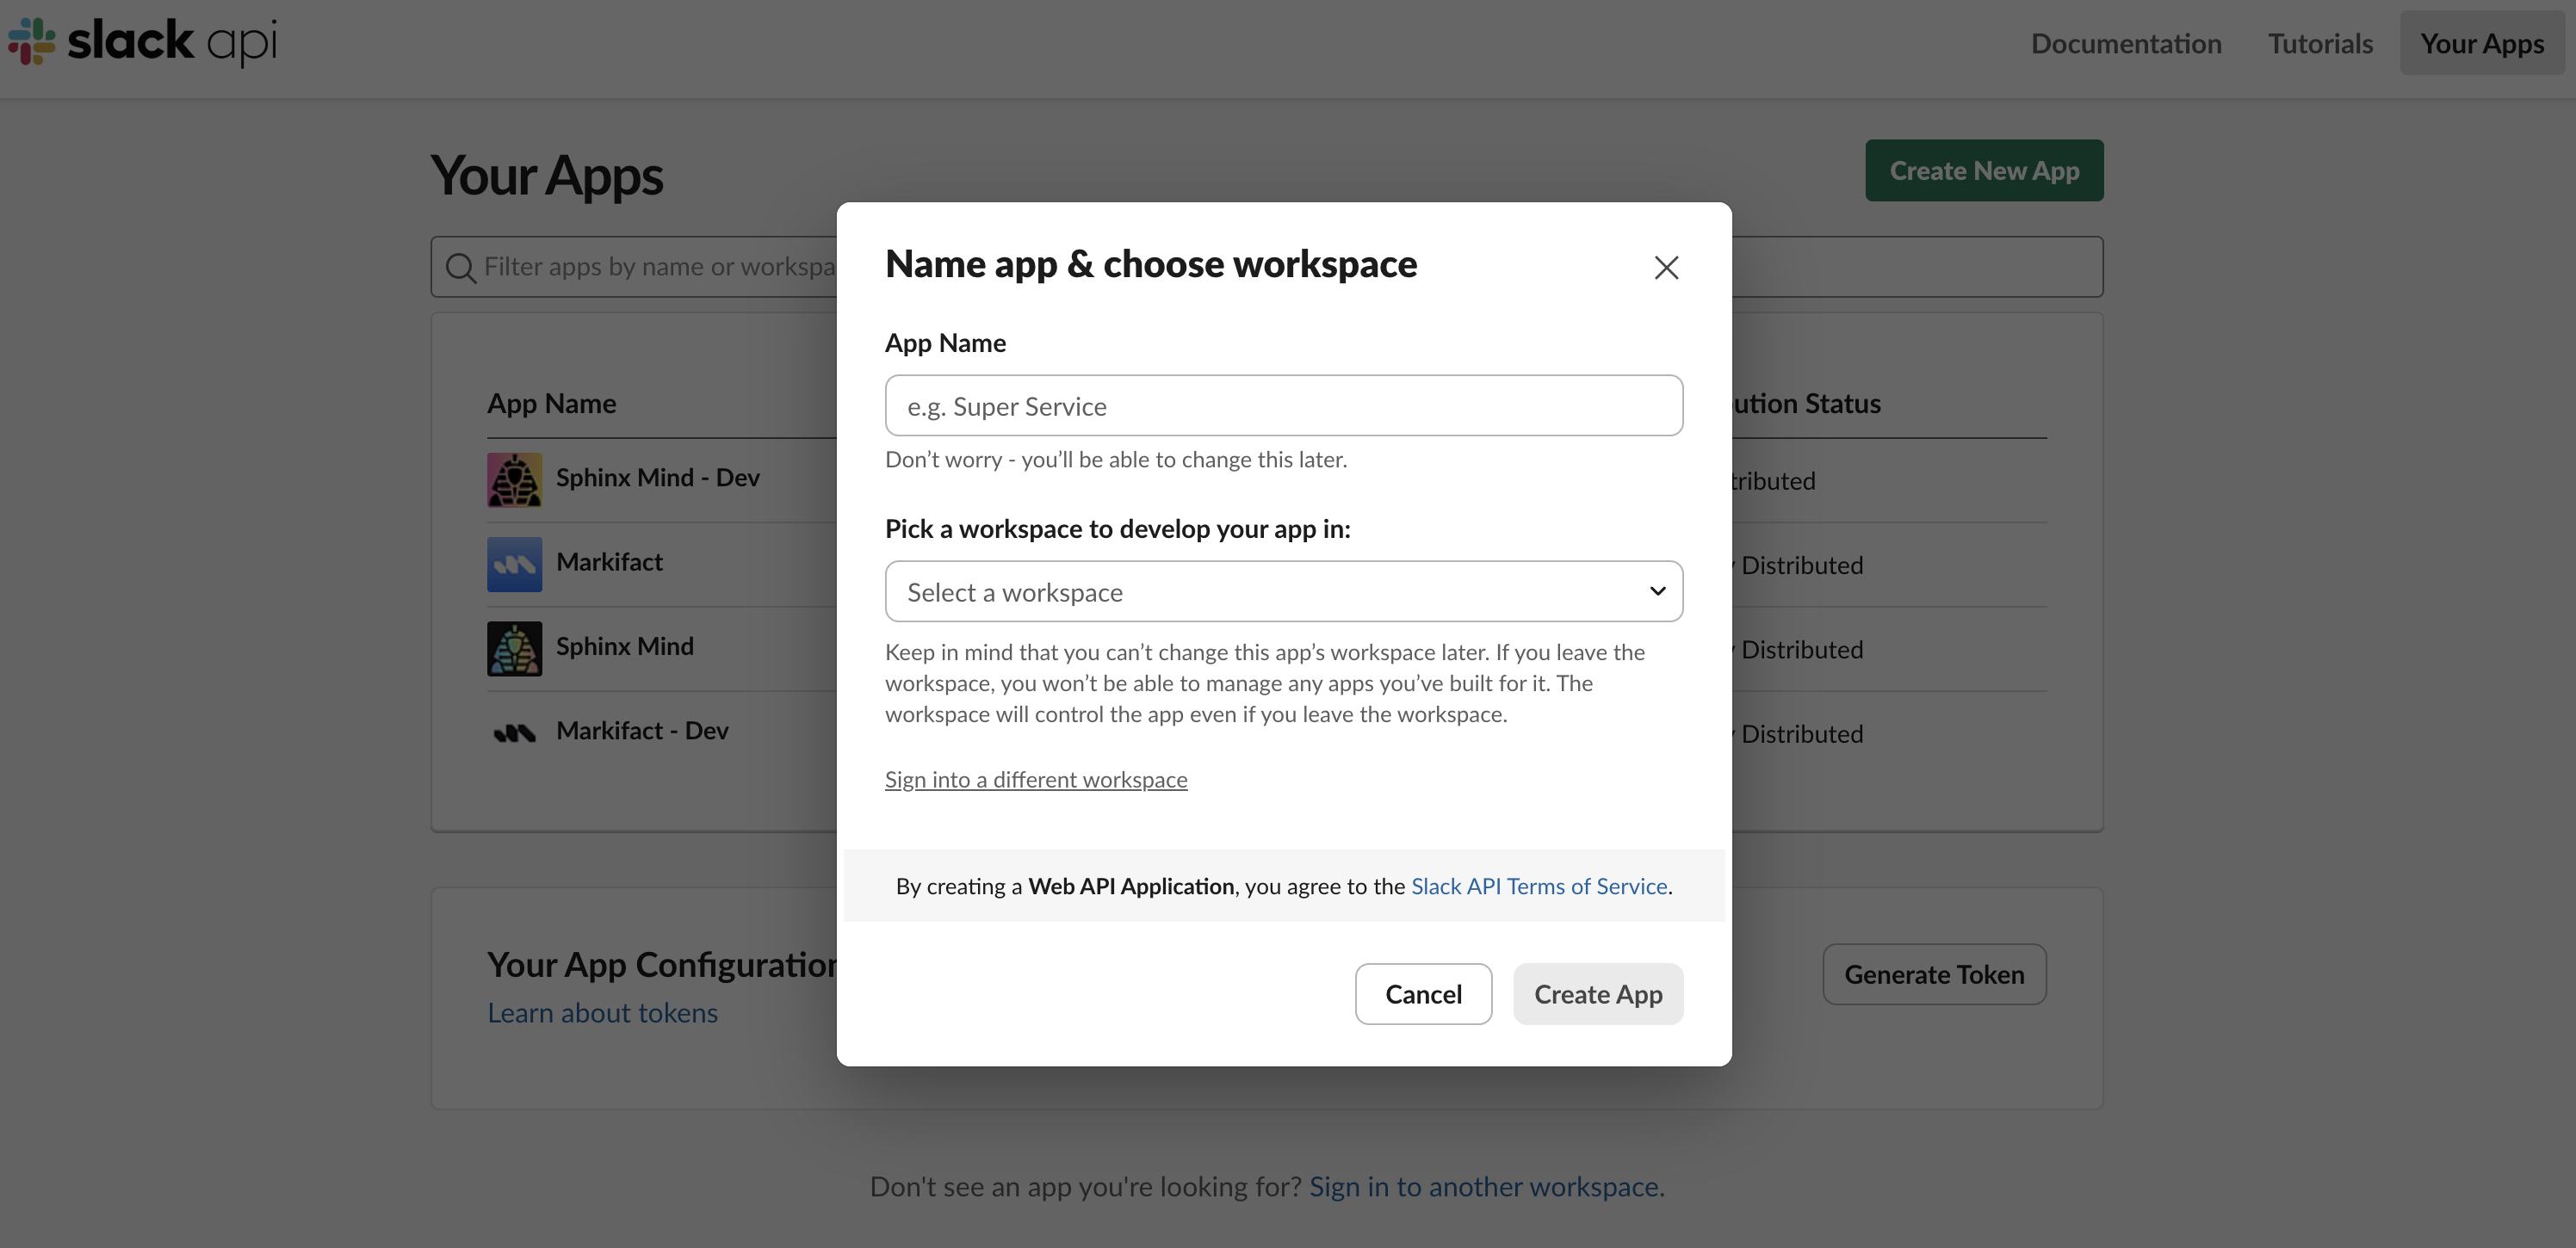
1. Go to [Slack API Apps](https://api.slack.com/apps/)
2. Click **"Create New App"**
3. Select **"From scratch"**
4. Enter your app name (e.g., "My Company Bot")
5. Select the workspace where you want to install the app
6. Click **"Create App"**
 Event Subscriptions allow your bot to receive messages and mentions from Slack.
1. In your app settings, go to **"Event Subscriptions"** in the left sidebar
2. Toggle **"Enable Events"** to **On**
3. In the **"Request URL"** field, enter:
```bash theme={"dark"}
https://api.markifact.com/slack/events
```
4. Wait for Slack to verify the URL (you'll see a green checkmark)
Event Subscriptions allow your bot to receive messages and mentions from Slack.
1. In your app settings, go to **"Event Subscriptions"** in the left sidebar
2. Toggle **"Enable Events"** to **On**
3. In the **"Request URL"** field, enter:
```bash theme={"dark"}
https://api.markifact.com/slack/events
```
4. Wait for Slack to verify the URL (you'll see a green checkmark)
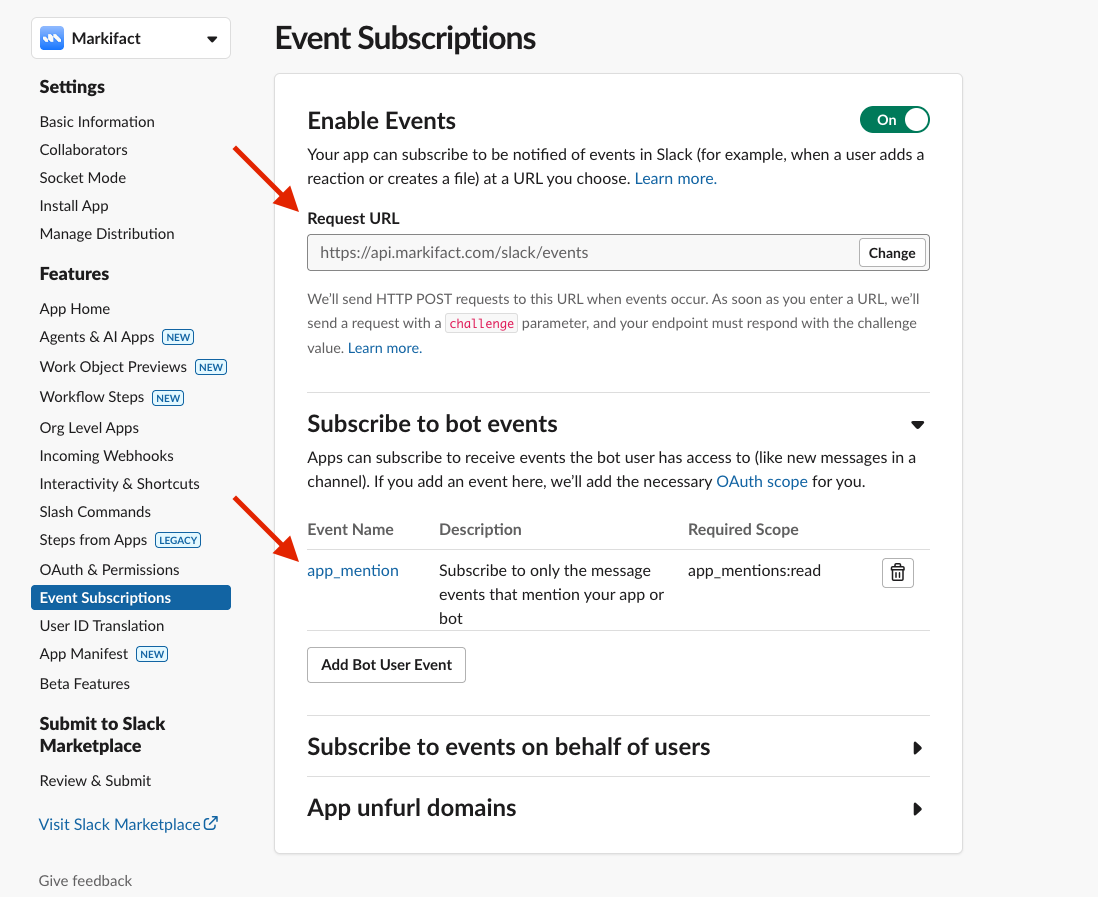 **Subscribe to Bot Events:** Expand **"Subscribe to bot events"** and add this event:
* `app_mention` - When users mention your bot
Click **"Save Changes"** at the bottom.
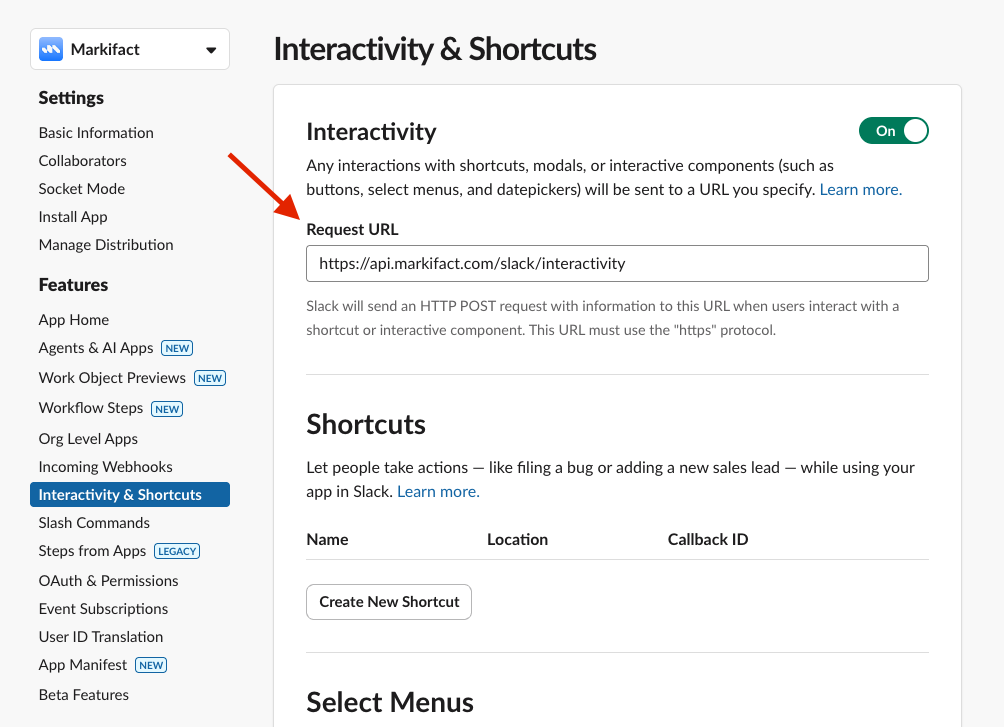
Interactivity enables buttons, menus, and other interactive elements in Slack messages.
1. Go to **"Interactivity & Shortcuts"** in the left sidebar
2. Toggle **"Interactivity"** to **On**
3. In the **"Request URL"** field, enter:
```bash theme={"dark"}
https://api.markifact.com/slack/interactivity
```
4. Click **"Save Changes"**
**Subscribe to Bot Events:** Expand **"Subscribe to bot events"** and add this event:
* `app_mention` - When users mention your bot
Click **"Save Changes"** at the bottom.
Interactivity enables buttons, menus, and other interactive elements in Slack messages.
1. Go to **"Interactivity & Shortcuts"** in the left sidebar
2. Toggle **"Interactivity"** to **On**
3. In the **"Request URL"** field, enter:
```bash theme={"dark"}
https://api.markifact.com/slack/interactivity
```
4. Click **"Save Changes"**
 When using the Markifact AI Agent in Slack, the agent sends interactive approval cards before performing write actions (like creating campaigns, updating budgets, or modifying ad groups). These cards have "Approve" and "Reject" buttons that require interactivity to be enabled.
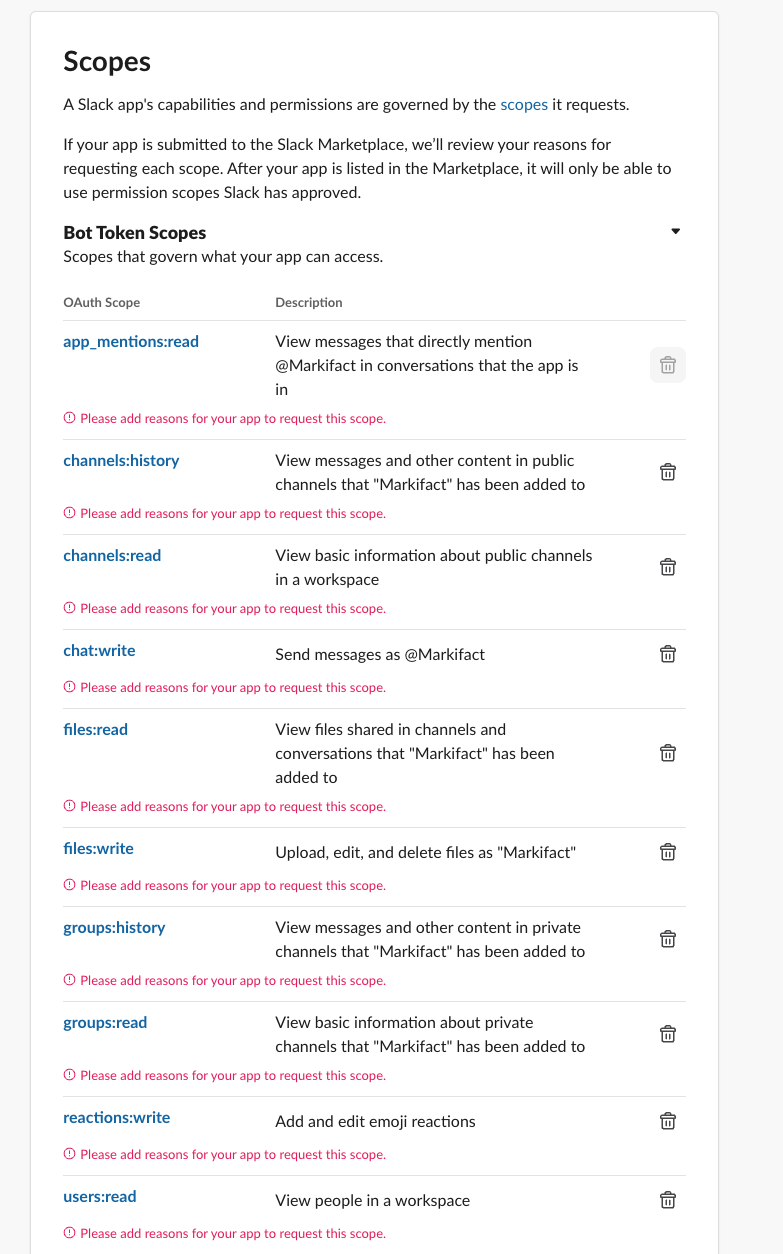
Scopes define what permissions your bot has in Slack.
1. Go to **"OAuth & Permissions"** in the left sidebar
2. Scroll down to **"Scopes"**
3. Under **"Bot Token Scopes"**, click **"Add an OAuth Scope"**
4. Add **all** of the following scopes:
**All scopes are required.** Do not skip any scope from the list below. Missing even one scope will cause certain features to fail.
| Scope | Purpose |
| :------------------ | :----------------------------------------------- |
| `app_mentions:read` | Receive notifications when your bot is mentioned |
| `channels:read` | View basic channel information |
| `channels:history` | Read messages in public channels |
| `groups:read` | View basic private channel information |
| `groups:history` | Read messages in private channels |
| `chat:write` | Send messages as your bot |
| `reactions:write` | Add emoji reactions to messages |
| `users:read` | View user information |
| `files:read` | View files shared in channels |
| `files:write` | Upload and share files |
When using the Markifact AI Agent in Slack, the agent sends interactive approval cards before performing write actions (like creating campaigns, updating budgets, or modifying ad groups). These cards have "Approve" and "Reject" buttons that require interactivity to be enabled.
Scopes define what permissions your bot has in Slack.
1. Go to **"OAuth & Permissions"** in the left sidebar
2. Scroll down to **"Scopes"**
3. Under **"Bot Token Scopes"**, click **"Add an OAuth Scope"**
4. Add **all** of the following scopes:
**All scopes are required.** Do not skip any scope from the list below. Missing even one scope will cause certain features to fail.
| Scope | Purpose |
| :------------------ | :----------------------------------------------- |
| `app_mentions:read` | Receive notifications when your bot is mentioned |
| `channels:read` | View basic channel information |
| `channels:history` | Read messages in public channels |
| `groups:read` | View basic private channel information |
| `groups:history` | Read messages in private channels |
| `chat:write` | Send messages as your bot |
| `reactions:write` | Add emoji reactions to messages |
| `users:read` | View user information |
| `files:read` | View files shared in channels |
| `files:write` | Upload and share files |
 1. Go to **"Install App"** in the left sidebar
2. Click **"Install to Workspace"**
3. Review the permissions and click **"Allow"**
4. Copy the **"Bot User OAuth Token"** (starts with `xoxb-`)
1. Go to **"Install App"** in the left sidebar
2. Click **"Install to Workspace"**
3. Review the permissions and click **"Allow"**
4. Copy the **"Bot User OAuth Token"** (starts with `xoxb-`)
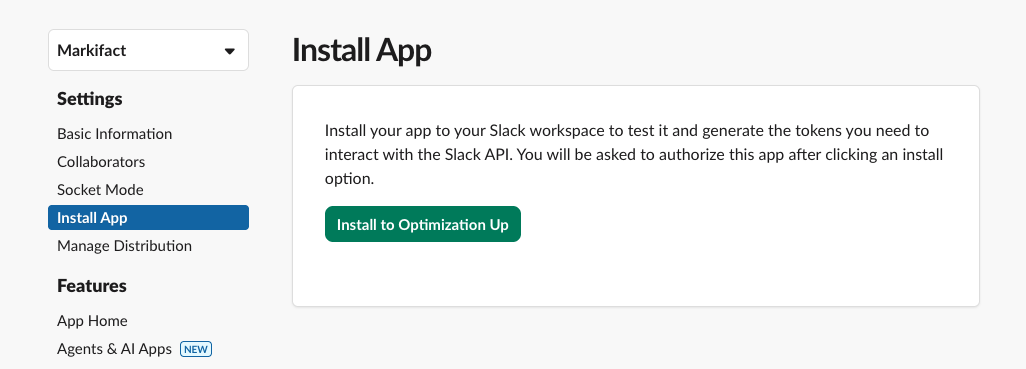 After installation, the bot token is generated. This token is what Markifact uses to authenticate API requests to Slack on behalf of your bot.
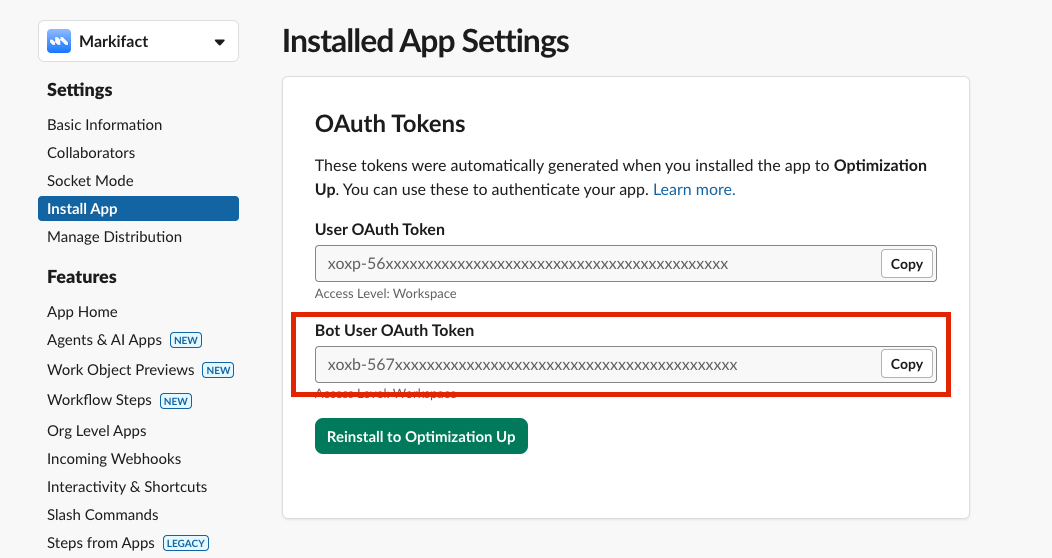 > **Important:** Keep this token secure. Anyone with this token can send messages as your bot.
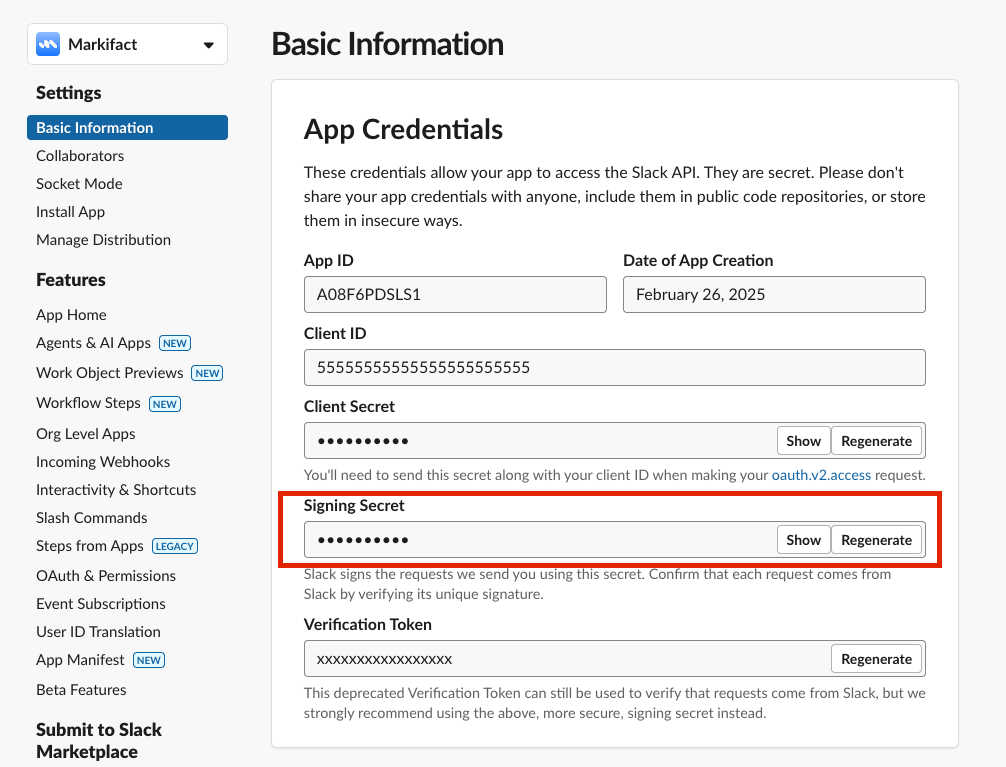
The signing secret verifies that requests to Markifact are actually from Slack.
1. Go to **"Basic Information"** in the left sidebar
2. Scroll down to **"App Credentials"**
3. Find and copy your **"Signing Secret"**
> **Important:** Keep this token secure. Anyone with this token can send messages as your bot.
The signing secret verifies that requests to Markifact are actually from Slack.
1. Go to **"Basic Information"** in the left sidebar
2. Scroll down to **"App Credentials"**
3. Find and copy your **"Signing Secret"**
 Now you have everything needed to connect your custom app to Markifact.
1. In Markifact, go to [Connections](https://app.markifact.com/connections) page
2. Click **"Connect Slack"**
3. Select the **"Your Own App"** tab
4. Enter your **Bot Token** (the `xoxb-` token from Step 5)
5. Enter your **Signing Secret** (from Step 6)
6. Click **"Verify & Connect"**
Now you have everything needed to connect your custom app to Markifact.
1. In Markifact, go to [Connections](https://app.markifact.com/connections) page
2. Click **"Connect Slack"**
3. Select the **"Your Own App"** tab
4. Enter your **Bot Token** (the `xoxb-` token from Step 5)
5. Enter your **Signing Secret** (from Step 6)
6. Click **"Verify & Connect"**
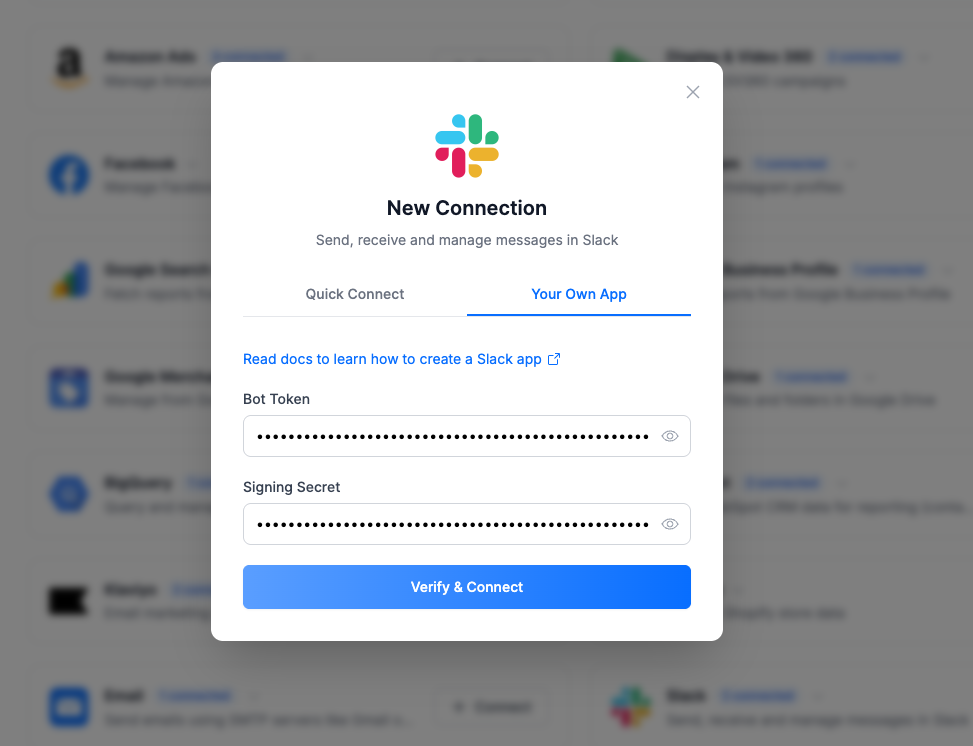 **Verification Success = Ready to Go!** Once Markifact verifies your credentials, your custom Slack app is fully connected. You can use it with both **Workflows** and the **AI Agent** — all Slack features are supported.
***
## Selecting Your Connection
When configuring Slack nodes or the AI Agent, you'll see your custom app connection in the dropdown. It displays as:
```
Your Workspace Name (Your Bot Name)
```
For example: **"Acme Corp (Marketing Bot)"**
Make sure to select the correct connection if you have multiple Slack connections.
***
## Verifying Your Setup
After connecting, test your setup:
1. **Create a simple workflow** with the Slack "New Message" trigger
2. **Add your bot to a channel** by typing `@YourBotName` in the channel
3. **Mention your bot** in a message
4. **Check that your workflow triggers** successfully
***
## Troubleshooting
Make sure you entered the exact URLs:
* Events: `https://api.markifact.com/slack/events`
* Interactivity: `https://api.markifact.com/slack/interactivity`
Check for typos and ensure there are no extra spaces.
Ensure you copied the **Bot User OAuth Token** (starts with `xoxb-`), not the User OAuth Token. You can find it under **"Install App"** after installing the app to your workspace.
The signing secret is found under **"Basic Information"** > **"App Credentials"**. Make sure you copy the entire secret without any extra spaces.
Check that:
1. **Signing Secret is correct** — A wrong signing secret is the most common cause. Markifact uses the signing secret to verify that incoming requests are actually from Slack. If it's incorrect, all events are silently rejected. Double-check you copied the correct secret from **"Basic Information"** > **"App Credentials"**.
2. Event Subscriptions are enabled with the correct URL
3. You've subscribed to the required bot events (`app_mention`)
4. The bot has been added to the channel
5. Your workflow is active and properly configured
6. **Correct connection selected** — If using the AI Agent, ensure your agent channel is active and using your custom app's connection. The connection should display as **"Workspace (Bot Name)"** (e.g., "Acme Corp (Marketing Bot)"). If it shows "Markifact" instead, you're using Quick Connect, not your custom app.
Review the OAuth scopes and ensure all required scopes are added. After adding new scopes, you need to **reinstall the app** to your workspace for changes to take effect.
This error appears when connecting your custom app and indicates that a required OAuth scope is missing — typically `users:read`.
**To fix:**
1. Go to your [Slack App Settings](https://api.slack.com/apps/)
2. Navigate to **"OAuth & Permissions"**
3. Under **"Bot Token Scopes"**, ensure `users:read` is added
4. After adding the scope, **reinstall your app** by going to **"Install App"** and clicking **"Reinstall to Workspace"**
5. Copy the new **Bot User OAuth Token** and update it in Markifact
**Verification Success = Ready to Go!** Once Markifact verifies your credentials, your custom Slack app is fully connected. You can use it with both **Workflows** and the **AI Agent** — all Slack features are supported.
***
## Selecting Your Connection
When configuring Slack nodes or the AI Agent, you'll see your custom app connection in the dropdown. It displays as:
```
Your Workspace Name (Your Bot Name)
```
For example: **"Acme Corp (Marketing Bot)"**
Make sure to select the correct connection if you have multiple Slack connections.
***
## Verifying Your Setup
After connecting, test your setup:
1. **Create a simple workflow** with the Slack "New Message" trigger
2. **Add your bot to a channel** by typing `@YourBotName` in the channel
3. **Mention your bot** in a message
4. **Check that your workflow triggers** successfully
***
## Troubleshooting
Make sure you entered the exact URLs:
* Events: `https://api.markifact.com/slack/events`
* Interactivity: `https://api.markifact.com/slack/interactivity`
Check for typos and ensure there are no extra spaces.
Ensure you copied the **Bot User OAuth Token** (starts with `xoxb-`), not the User OAuth Token. You can find it under **"Install App"** after installing the app to your workspace.
The signing secret is found under **"Basic Information"** > **"App Credentials"**. Make sure you copy the entire secret without any extra spaces.
Check that:
1. **Signing Secret is correct** — A wrong signing secret is the most common cause. Markifact uses the signing secret to verify that incoming requests are actually from Slack. If it's incorrect, all events are silently rejected. Double-check you copied the correct secret from **"Basic Information"** > **"App Credentials"**.
2. Event Subscriptions are enabled with the correct URL
3. You've subscribed to the required bot events (`app_mention`)
4. The bot has been added to the channel
5. Your workflow is active and properly configured
6. **Correct connection selected** — If using the AI Agent, ensure your agent channel is active and using your custom app's connection. The connection should display as **"Workspace (Bot Name)"** (e.g., "Acme Corp (Marketing Bot)"). If it shows "Markifact" instead, you're using Quick Connect, not your custom app.
Review the OAuth scopes and ensure all required scopes are added. After adding new scopes, you need to **reinstall the app** to your workspace for changes to take effect.
This error appears when connecting your custom app and indicates that a required OAuth scope is missing — typically `users:read`.
**To fix:**
1. Go to your [Slack App Settings](https://api.slack.com/apps/)
2. Navigate to **"OAuth & Permissions"**
3. Under **"Bot Token Scopes"**, ensure `users:read` is added
4. After adding the scope, **reinstall your app** by going to **"Install App"** and clicking **"Reinstall to Workspace"**
5. Copy the new **Bot User OAuth Token** and update it in Markifact
 ***
## Summary
| Item | Where to Find | What It Looks Like |
| --------------------- | ----------------------------------- | ----------------------------------------------- |
| **Bot Token** | Install App → Bot User OAuth Token | `xoxb-1234567890-...` |
| **Signing Secret** | Basic Information → App Credentials | `abc123def456...` |
| **Events URL** | For Event Subscriptions | `https://api.markifact.com/slack/events` |
| **Interactivity URL** | For Interactivity & Shortcuts | `https://api.markifact.com/slack/interactivity` |
***
## Related
Trigger workflows when your bot is mentioned
Send messages and files to Slack channels
***
## Summary
| Item | Where to Find | What It Looks Like |
| --------------------- | ----------------------------------- | ----------------------------------------------- |
| **Bot Token** | Install App → Bot User OAuth Token | `xoxb-1234567890-...` |
| **Signing Secret** | Basic Information → App Credentials | `abc123def456...` |
| **Events URL** | For Event Subscriptions | `https://api.markifact.com/slack/events` |
| **Interactivity URL** | For Interactivity & Shortcuts | `https://api.markifact.com/slack/interactivity` |
***
## Related
Trigger workflows when your bot is mentioned
Send messages and files to Slack channels