Trigger vs Action Nodes
There are two types of nodes in Markifact:- Trigger Node – Starts the workflow. This could be time-based (e.g., every Monday), event-based (e.g., new Slack message), or manual.
- Action Node – Performs a specific task. This includes pulling data, transforming it, sending it, or using AI to analyze it.
Common Node Categories
While all action nodes technically follow the same structure, they fall into categories based on behavior:| Category | Description | Examples |
|---|---|---|
| Pull Data | Fetches data from a source | Google Ads, BigQuery, Meta Ads |
| Transform | Processes or reshapes the data | Filter Rows, Sort, Rename Fields |
| AI | Uses language models to analyze or generate | Ask AI, Analyze Data, Summarize |
| Send | Sends data to a destination | Google Sheets, Slides, Slack |
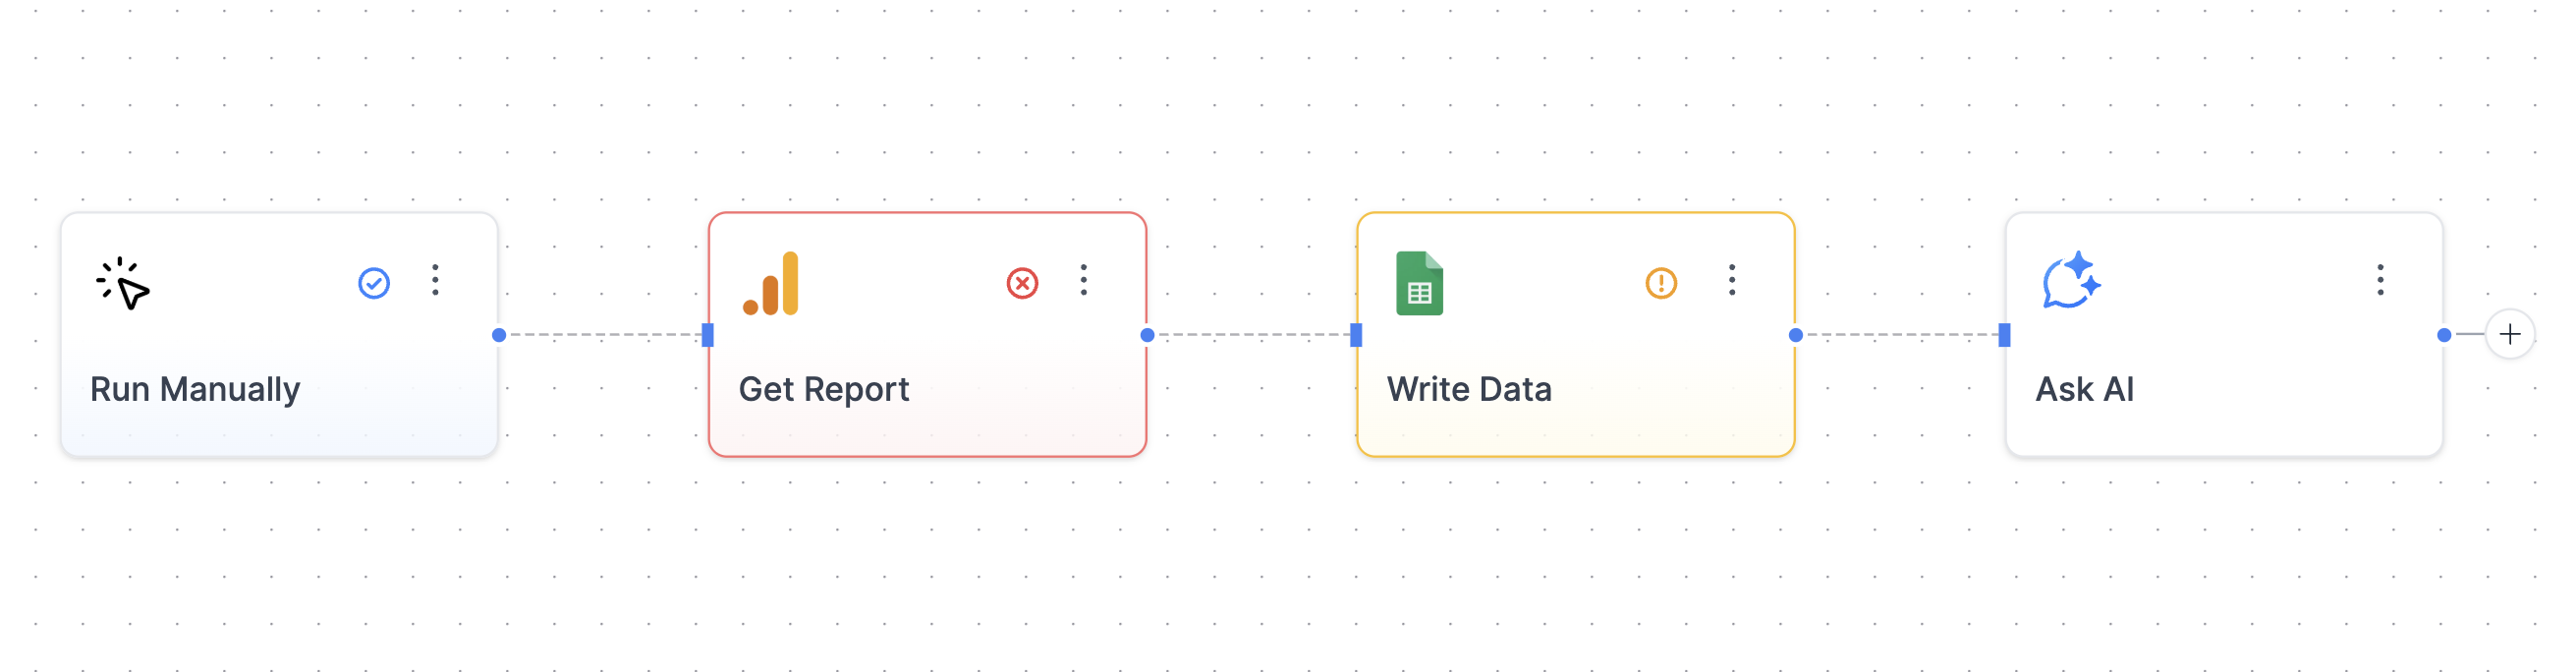
Node Status Indicators
Nodes display visual indicators to show their current state:| Status | Description |
|---|---|
| No badge or icon | Node is ready to run and properly configured |
| ⚠️ Warning (orange circle) | Configuration is incomplete - missing required fields or settings |
| ❌ Error (red X) | Last run failed - check the Logs panel for error details |
| ✅ Success (blue checkmark) | Last run completed successfully |
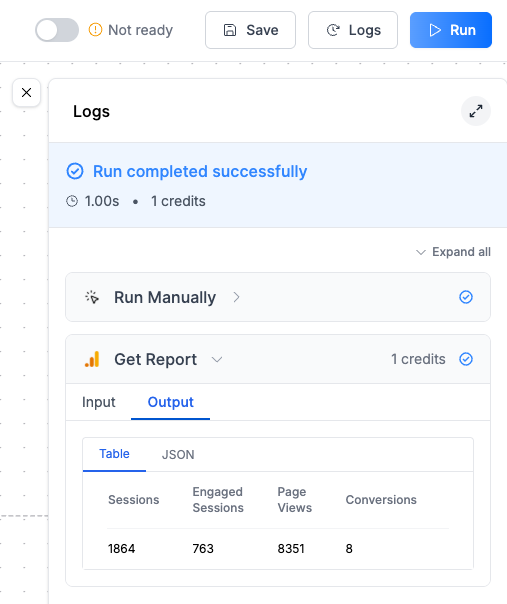
Inputs & Outputs
Each node receives input from the previous step and produces output for the next one.Where to View Inputs and Outputs
After running a workflow:- Open the Logs panel
- Click any node to expand its details
- Toggle between Input and Output tabs
- You can view both Table and JSON formats
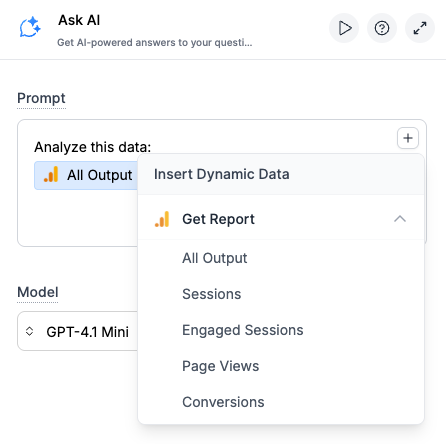
Passing Data Between Nodes
You can reference the output of any previous node using the dynamic data picker. For example, when sending data to Google Sheets:- Click on the Data field
- Choose “Insert Dynamic Data”
- Pick the output from a previous node (e.g.,
Get Report) - You can insert the entire output, or individual fields like
Sessions,Page Views, etc.
Common Issues: “I Don’t See Any Output to Select”
If a node’s output doesn’t show up in the dynamic data picker, here are the most likely reasons:1. Node isn’t fully configured
- Some fields might be missing (e.g., missing credentials, dataset, or query).
- You’ll usually see a warning badge around the node.
- Make sure all required fields are filled out and saved.
2. Node hasn’t been run yet (for preview-only outputs)
- Some nodes like BigQuery or Google Sheets require an actual run to generate outputs.
- These nodes fetch dynamic fields (e.g., column names or schema) and can’t predict output without executing.
🔍 Important: Even if the node technically works, its output might not be “discoverable” in downstream nodes until it’s run.
3. You’re referencing a node that produced no output
- If the node ran but returned nothing (e.g., an empty query result), the output might be technically “valid” but invisible.
- Check the Logs tab → Output to confirm there’s data.
4. Node isn’t connected or dependent on the target node
- The dynamic data picker only shows outputs from nodes that are in the same execution path as your current node.
- If nodes are in different branches or not connected through the workflow path, their outputs won’t be available.
- Make sure there’s a clear execution path from the source node to your current node.
Best Practices
- Give your nodes clear labels (e.g. “Pull Meta Ads – Last 7 Days” instead of just “Get Report”)
- Always run a node once before using its output in another node (especially for BigQuery, Sheets, or Docs)
- Use the Logs tab to confirm output and test your logic
- Use “Use All Data” for tables and field-level insertion for messages and AI steps
FAQ
I got 'Resource limit exceeded. The data output from this node is too large' error
I got 'Resource limit exceeded. The data output from this node is too large' error
This means a single node exceeded the 15 MB limit, or your total workflow exceeded 20 MB. Break your workflow into smaller pieces: split large data pulls across multiple workflows, use date ranges to get smaller chunks of data, and filter your reports to only essential metrics.
Why is the dynamic data picker not showing any fields from my previous node?
Why is the dynamic data picker not showing any fields from my previous node?
Some nodes (like BigQuery or Google Sheets) need to be run before their output becomes available. This is because they generate output dynamically based on actual query results or fetched data. Make sure the node has run successfully and returned valid data before using it in downstream nodes.
How do I see what data is being passed between nodes?
How do I see what data is being passed between nodes?
After running your workflow, open the Logs panel. Click on any node to inspect its input and output. You can switch between table view and raw JSON. This is helpful for debugging and validating your automation.
Can I use output from a node that's not directly connected to my current node?
Can I use output from a node that's not directly connected to my current node?
Yes! You can reference output from any node that’s in the same execution path as your current node, even if they’re not directly connected. The dynamic data picker shows all available outputs from nodes that will execute before your current node in the workflow path.
What happens if I delete a node that other nodes depend on?
What happens if I delete a node that other nodes depend on?
If you delete a node whose output is being used by other nodes, those dependent nodes will show errors and need to be reconfigured. You’ll see “Missing Node Reference” errors in the UI where the deleted node’s data was referenced. Always check for dependencies before deleting nodes.
What does 'Missing Node Reference' mean and how do I fix it?
What does 'Missing Node Reference' mean and how do I fix it?
This error appears when a node tries to reference data from another node that has been deleted or disconnected. To fix it:
- Check if the referenced node was accidentally deleted and restore it if needed.
- If the node was intentionally removed, update all fields that reference it by selecting a different data source from the dynamic data picker.
- Remove any dynamic references that are no longer needed. The error will show exactly which field has the broken reference.
Why do some nodes show a warning badge?
Why do some nodes show a warning badge?
Warning badges appear when a node has missing required fields, invalid configurations, or authentication issues. Click on the node to see specific error messages and fix the configuration.
Can I rename a node without breaking my workflow?
Can I rename a node without breaking my workflow?
Yes, renaming a node won’t break existing connections or references. The workflow uses internal IDs, not display names, to track node relationships.
How do I know if my node configuration is correct before running the workflow?
How do I know if my node configuration is correct before running the workflow?
Some nodes provide preview capabilities or validation feedback. Look for preview buttons or run individual nodes to test their configuration. You can also check for warning badges or error messages in the node settings.
What's the difference between 'Use All Data' and selecting individual fields?
What's the difference between 'Use All Data' and selecting individual fields?
‘Use All Data’ passes the entire output (all rows and columns) to the next node, while selecting individual fields lets you pick specific data points. Use ‘Use All Data’ for tables and data processing, and individual fields for messages, AI prompts, or specific values.
Why does my workflow stop at a certain node?
Why does my workflow stop at a certain node?
Workflows stop when a node encounters an error, fails authentication, or returns no data when data is expected. Check the Logs panel for specific error messages and ensure all nodes are properly configured with valid credentials.